End User Guide
Introduction
Report2Web is a report distribution, archival and retrieval solution that lets you access critical business documents using a standard Web browser. Report2Web reports are consolidated from diverse computing platforms including mainframes, UNIX servers, iSeries systems, and client/server environments. Reports from any platform or application are automatically published in a secure folder structure on the Report2Web server. The reports are distributed through the corporate Intranet or Extranet.
Report2Web consolidates various report formats to allow remote viewing and printing. Formats include standard ASCII files, standard print file formats, desktop application files such as Microsoft Office and PDF files, scanned images, and more.
The Report2Web server repository offers a central location for report access. In addition to browser access, you can subscribe to email notification when a report is available. Email distribution supports file attachments or a hyperlink back to the application. Report2Web automates the collection and processing of reports published routinely by applications within an organization. The Burster (an add-on module) separates reports into smaller pieces that are routed to secure folders. The exclusive PageMart technology enables medium to large reports (up to one million pages) for optimal viewing, even over slower network connections.
Common Questions
How does Report2Web work?
The Report2Web server monitors directories for incoming content and places each report into its proper folder. For instance, financial reports might be organized by branch or office so that they are easy for a regional manager to find. Once placed into the appropriate location, reports are immediately available to you via the corporate Intranet/Extranet. Report profiles can be created to automate the publication process, minimizing the ongoing requirement for manual publishing while saving both time and money, and reducing errors. Report2Web complements other reporting software that companies may already have in place, such as data mining, OLAP, and report-writer tools, capturing their output and making it instantly available to the end user community.
How are files captured from other applications?
Input can come from any system or application in your enterprise. As a Web-based solution, Report2Web formats and distributes reports using files and print stream data without requiring modifications to the applications that are generating the data. Most often, input is intercepted or rerouted from a host system print stream, saving the processed report in the Report2Web Catalog. Reports are usually published into the system through batch file transfers; typically through FTP or other standard data transfer protocols like LPD/LPR. Direct capture from scanning applications, whether in batch or on an ad-hoc basis is also supported.
Can report content be modified?
No, not directly. To maintain the integrity of all content, all stored documents are "frozen in time." While it is possible to download reports to your PC where the data can be modified, there is no way to directly modify the stored copy. Each version of a given report is uniquely maintained, providing a comprehensive history of all report iterations.
How does security work?
Once you have logged in, two layers of security are used to determine the content that you have access to as well as what functions you can perform on the content and within the application in general. These two key pieces to security are known as Content Access and Authorizations. Content Access controls which folders you can see within Report2Web as well as the type of permission associated with each folder (Read, Change or Full Control). Authorizations control things such as whether you have administrative authority as well as typical features such as the ability to e-mail, search, download and subscribe to content. Based on your unique combination of Content Access and Authorizations the application will dynamically change to enable or disable the appropriate features.
Accessibility Support
-
Advance through the folder tree by pressing the Tab key.
-
Press the Shift+Tab key to navigate backwards through the folder tree.
-
When keyboard focus is on the Expand-Collapse folder icon (plus or minus sign) within the tree, press the Up or Down arrow key to expand or collapse the folder as appropriate.
-
When keyboard focus is on a folder name, press the Enter key to view the contents of the folder.
-
When accessing the Online Help, press the Enter key to activate the Help dialog once it is displayed.
Signing in to Report2Web
Before accessing any reports, you must first sign in to the application. Based on several defaults established by your administrator, various options may be available to you during the sign in process and the overall look and feel, or theme of the application may be different. Screenshots below assume the default Novum theme is being used. Sign on is supported via a corporate or local user id and password. The method used to sign in will be determined by your administrator. For example, rather than being presented with the standard sign-in page, your administrator may have decided that a Single Sign On environment is preferred in which case you will bypass the standard sign in page.
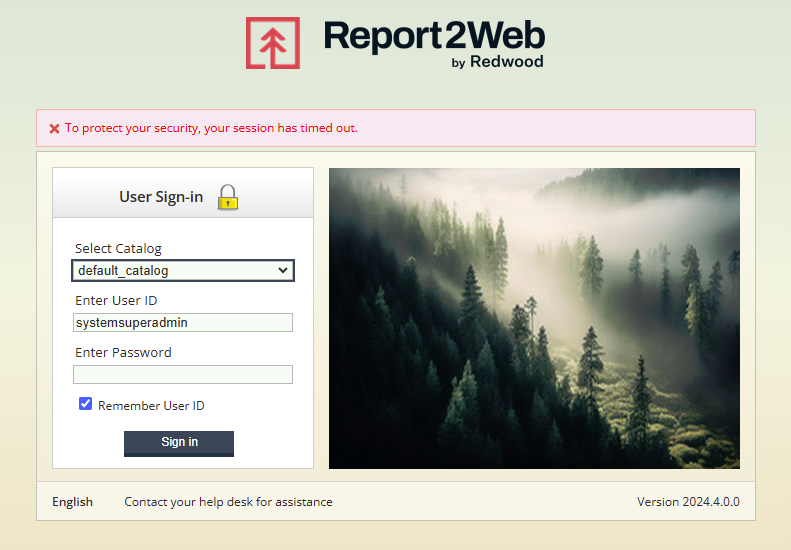
If you are presented with the sign-in screen you will need to specify which Catalog of information you want to initially access. Catalogs are sorted in alphabetical order, but the last Catalog that you signed into will always be selected by default. Once a Catalog has been selected, provide the User ID and Password you wish to use for authentication. If you change the selected Catalog after providing credentials, the credentials will be cleared out and you will need to provide proper credentials for the newly selected Catalog.
Selecting the Remember User ID option will remember your User ID after you terminate a session so that the next time you access the sign in page, it is pre-populated for you. The ability to remember a User ID is an administrator defined parameter and will only be available if enabled for the system in general.
One or more hyperlinks may be shown at the bottom of the sign-in page. Best practices recommend that your administrator provide links for you to easily contact your organization’s internal help-desk support or answer frequently asked questions.
The bottom of the sign-in page also includes an option to modify the default language that will be used for the application after you sign in. If your administrator has enabled multiple languages, clicking on the current language will display a dropdown list of available languages for selection. After selecting your desired language click the Change Language (green arrow) button. To ignore the language selection option without making changes, click the Hide change language controls button (X button).

Password Expiration
If your organization is making use of the local application user directory (as opposed to or in addition to an existing corporate directory), you may be prompted to change your password upon initial sign in or when your current password has expired based on policies established by your administrator.
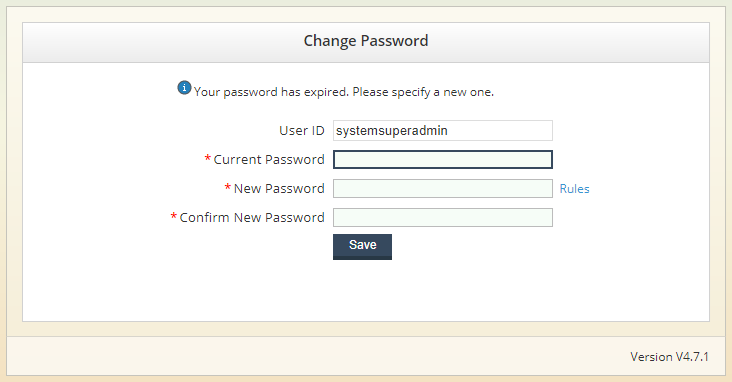
If your password has expired, before successfully signing in again, you will be prompted to provide your Current Password along with a New Password that adheres to the policies established. To view the password rules currently enforced, click on the Rules label. Depending on the rules enforced, you may be prohibited from reusing a previous password. Click the Save button to finalize your new password. If your new password does not conform to all the password rules, an error message will be displayed, prompting you to reenter a new password. If there are no errors with the creation of your password, a message will be displayed indicating the successful change. Follow the link included in the message to return to the sign in page and then enter your user id and newly created password.
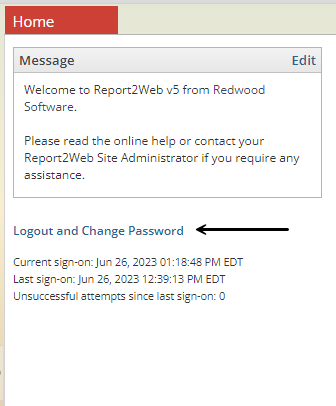
Similarly, if your administrator has enabled the option to let you change your password at any time, a Change Password link will be displayed on the Home page. When clicked, it will prompt you to provide both current and new password information.
Failed Log in Attempts
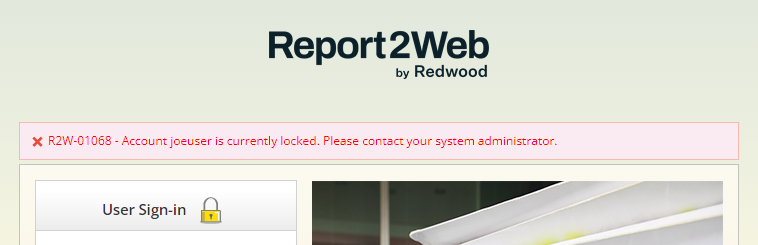
If you are a local application user, your administrator may have placed a limit on the number of unsuccessful log in attempts that can be completed before locking your account. In the event your account has been locked, an appropriate message will be displayed on the sign in page. To unlock your account, you will need to contact your administrator.
Navigating the Report2Web Interface
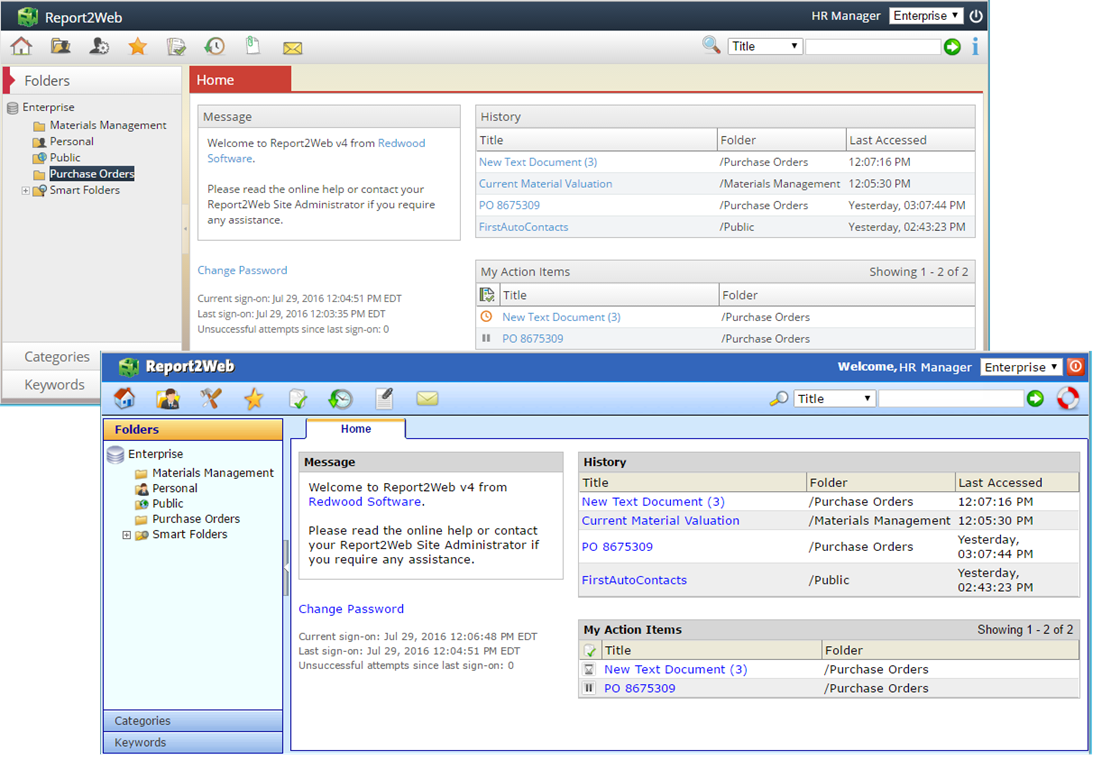
Before you can begin viewing and working with reports, you will need to become familiar with the main areas of the application and how they are used. There are four distinct areas that you will be interacting with: The Title bar, the Toolbar, the Menu pane and the Content Area.
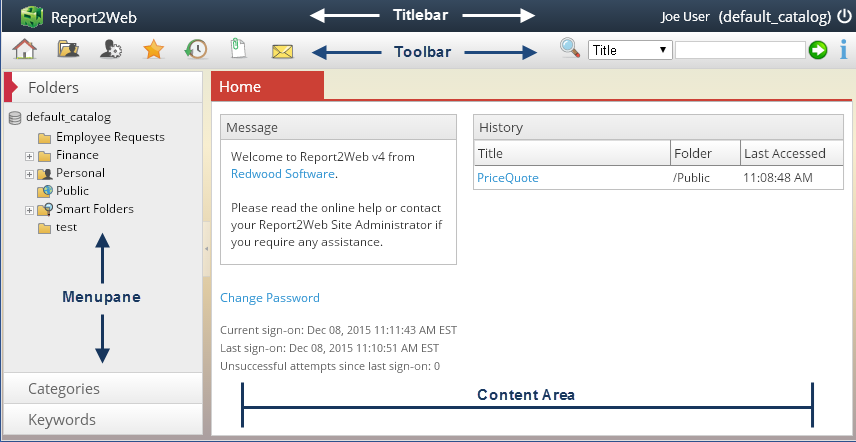
The Title Bar
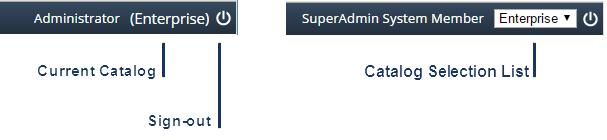
At the top of the application window, the Title bar displays your name and the current Catalog name. To the right of the Catalog name, you can log out of your session by clicking the Sign out button. If you have access to more than one Catalog, a list enumerating all available Catalogs will be displayed (in alphabetical order) rather than a static Catalog name. The list of Catalogs available for selection is based on your individual security settings and as such, may not be a complete Catalog listing. To switch to a different Catalog, select the Catalog name from the list.
The Toolbar
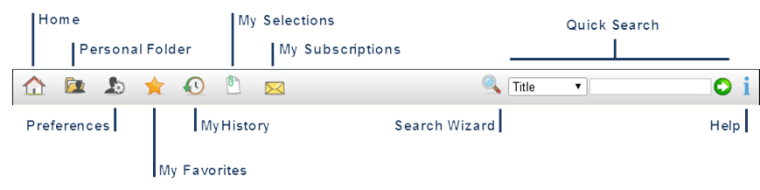
The Toolbar provides one-click access to some of the most commonly used features of the application. Below is a listing of the standard Toolbar options and the functionality they provide. As you select each option, the display in the Content Area will immediately change to reflect your selection.
|
Home |
Refreshes the Content Area with standard Home tab content. |
|
Personal Folder |
Reports published in folders that are inherently accessible only to the logged in user. Other than administrators, a Personal Folder cannot be accessed by any other users. Depending on settings established by your Administrator, this feature may be disabled. |
|
Preferences |
Allows you to specify your personal preferences for configurable items such as toolbar display, application theme and approval delegates. |
|
My Favorites |
Spanning across all folders, provides instant access to the most recent version of frequently used reports, without requiring any additional folder navigation. Depending on settings established by your Administrator, this feature may be disabled. |
|
My History |
Provides links to reports recently viewed by the logged in user. Depending on settings established by your Administrator, this feature may be disabled. |
|
My Selections |
Applicable only to the current browser session, groups documents together for subsequent actions such as printing or e-mail. Depending on settings established by your Administrator, this feature may be disabled. |
|
My Subscriptions |
Displays a list of current subscriptions associated with the logged in user and provides instant access to subscription editing. Access to this icon is based on individual user authorizations. |
|
Search Wizard |
Provides access to the Keyword and Advanced Search Wizards. Access to this icon is based on individual user authorizations. |
|
Quick Search |
Allows for simple searches based on standard report metadata (e.g. Title, Author, etc.). Access to this icon is based on individual user authorizations. |
|
Help |
Displays the Help Menu. Individual user authorizations will control which sections of the Help will be available. |
The Content Area
The central area of the application is known as the Content Area and is dedicated to viewing report and folder lists, viewing and working with report content and (based on authorizations), reviewing and managing system information and settings.
The Menu Pane
Located on the left side of the window, the Menu pane provides access to folder navigation, Category and Keyword searching and a variety of administrative functions. Many of the functions within each tab of the Menu pane are controlled by authorizations setup by your administrator. To switch between areas of the Menu pane, click on the title of the desired tab. The typical tabs that end users will have access to have been highlighted below.
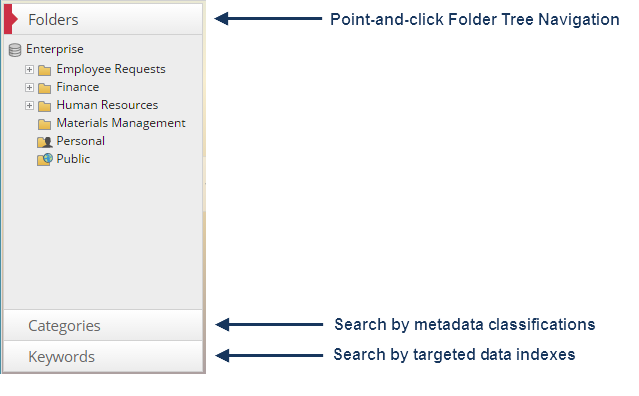
The Menu pane options that are available to you will be based on your individual security settings. If you do not have the appropriate security to access all the functionality contained within a selected tab, only those features that you are authorized to see will be displayed. If you do not have authorization to access anything contained within a tab, the entire tab will be hidden.
Customizing User Preferences
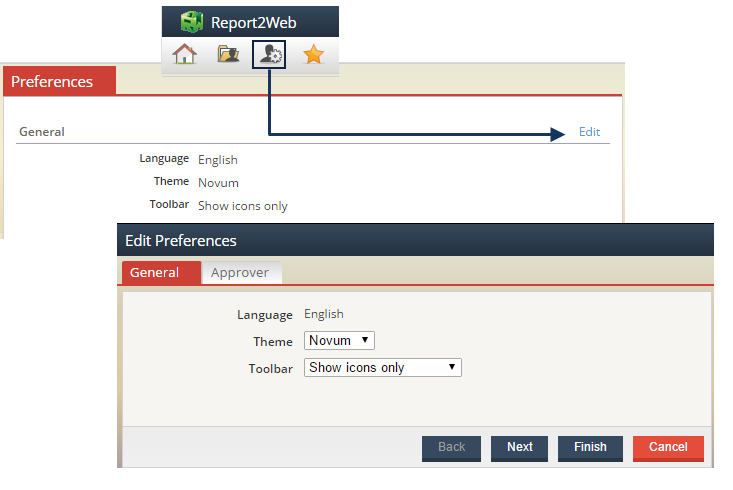
All users can control their personal preferences. From the Toolbar, click the Preferences icon to view your current preferences. While the preferences available to you will vary based on individual your security, all users will have the option to modify the Theme, Language and Toolbar display settings. To modify any of the available settings, click on the Edit link in the upper right corner of the Preferences tab. The Edit Preferences Wizard is typical of all Wizards in the application, with each group of settings appearing as a “Page” of the Wizard. With all Wizards, if a field is required, a red asterisk (*) will be displayed next to the field name and advancement through the Wizard will not be available until the required information has been provided.
In the screen shot below for example, alternate languages have not been enabled on the Report2Web server so the edit option is disabled, while the ability to modify how toolbar icons will be displayed (with or without a text label below them) is accessible along with the Theme. After making any necessary changes, click Finish and refresh the screen or log out/in to see your changes.
Customization of the 3rd Party Apps options are discussed later in the help.
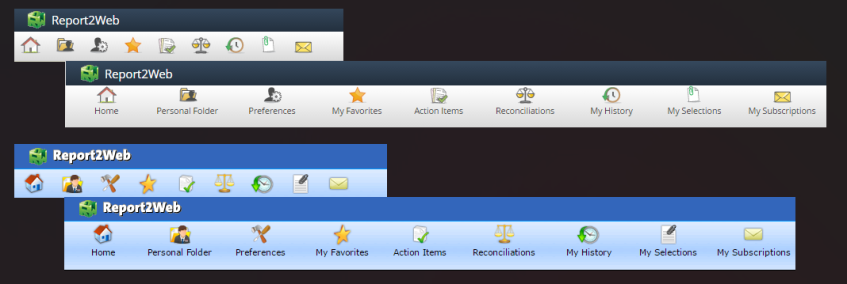
Modifying the Theme and Toolbar Display
Unless changed by your administrator, by default, the Report2Web application will display with the grey, red and blue based “Novum” theme when you first sign in to the application. If desired, within your User Preferences, you can switch between the “Novum” theme and the more blue-based “Classic” theme. In both cases, the layout of the application will be the same, but colors and icons will be different. Examples of Novum and Classic themes are shown below. For Online Help purposes, all content is referencing the look and feel of the Novum theme.
Similarly, you can change the appearance of the uppermost toolbar within the User Preferences as well. The toolbar can be condensed to show only Icons with helpful tooltips or Icons with the label (tooltip) displayed below. The screenshots below depict toolbar options for both the Novum and Classic themes.
Customized Environments
Report2Web makes use of a number of unique “views” within the application to display lists of documents as well as many dialoges to display or enter information. Throughout the Online Help, when a list view or dialog is referenced or depicted in a screen shot, all default values associated with the view are dialog are assumed (e.g. Title, Author, Folder, etc.). Specific to document list views, all default column selections are also depicted.
Depending on Global List View Settings Global List View Settings and individual List View Settings established by your administrator, the default naming conventions, display columns, column order and sort order implemented in your environment may be different than those shown. For example, the administrator may have opted to rename the “Description” label to “Report ID” or perhaps opted to remove the "File Name" column when viewing documents within a folder.
Viewing Reports
Displaying Report Lists
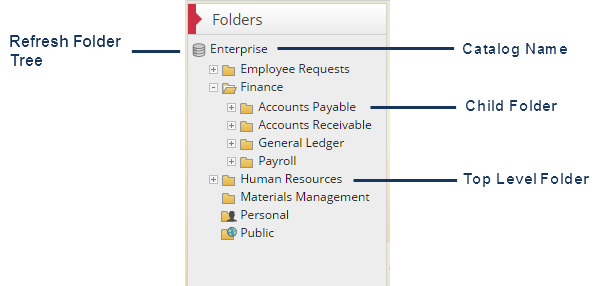
One of the most frequently used methods of finding a report is to simply navigate through the folder tree to locate a desired report. The folders that you can see within the tree are determined by security settings (known as Content Access) as established by an administrator.
Folders are typically organized in a hierarchy structure with root and subfolders. Top Level folders that have additional subfolders beneath them will have a plus icon displayed next to the folder name. Click on the plus icon to expand or collapse a folder.
After selecting a folder, any reports contained within that folder are immediately listed within the Content Area. The Publication List View contains columns of information that give you at-a-glance information about the report before opening it. If desired, the Title, Name, Author and Date columns can easily be sorted by clicking on the column name.
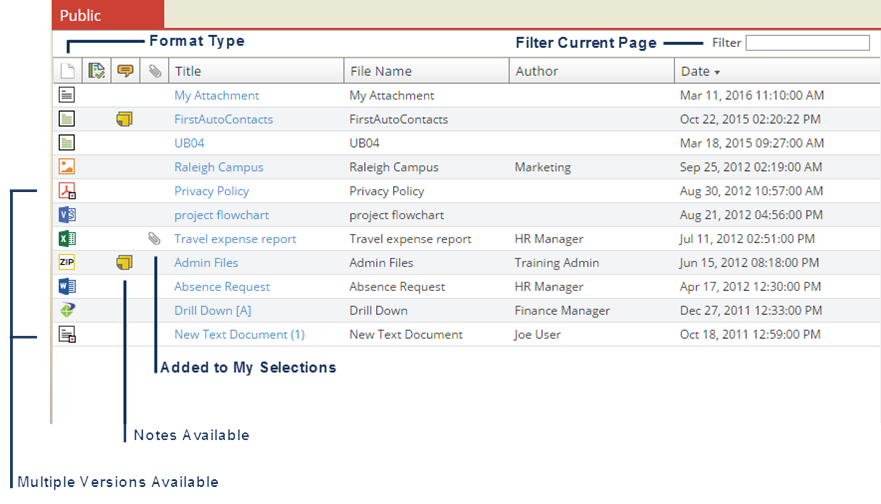
A list of the default columns and their descriptions are provided below.
|
File Type |
Displays the application icon associated with the default format of the report. If more than one version of a given report exists, a plus sign will be displayed over the icon. |
|
Notes |
Indicates that a Note is associated with the selected document. Click on the Notes icon to view any notes and/or attachments associated with the document. |
|
Selections |
Flags documents that have been added to your personal selections for the current session. |
|
Title |
Displays the published title of the selected report. |
|
Name |
Displays the captured file name of the report. |
|
Author |
Displays the author of the selected report. Authors can be a specific person, group, application name, etc. |
|
Date |
Effective date of the selected report. |
|
Filter |
Allows the user to pare down the report list by filtering on the Title field. When a string is entered, only those reports with a matching string will be shown. Note this is valid only for the current page. |
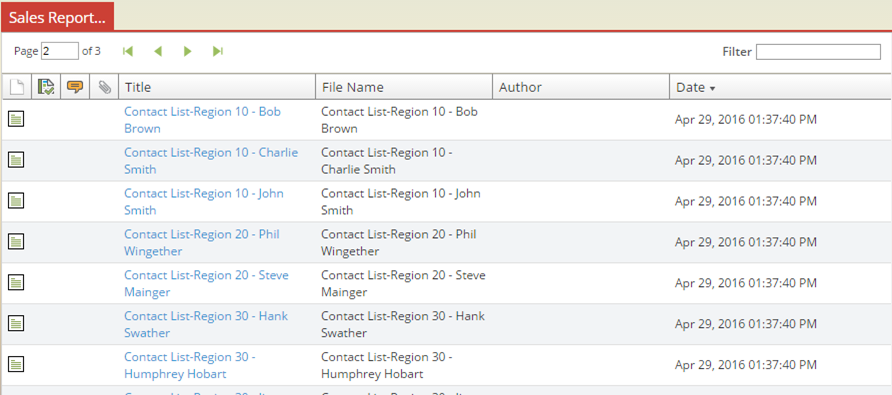
Paged List Views
As any number of documents can be housed within a given folder, administrators establish defaults to control how many items per “page” will be displayed when you view the list of content within a given folder. If the total number of items contained within a given folder exceeds the defined limit, you can directly jump to a specific “page” of the list by entering the page number in the supplied text box or you can navigate through pages using the first, previous, next and last page buttons.
Viewing Different File Types
Based on the file type of the selected report, the appropriate viewer will be invoked when attempting to display a report. The application provides native support for viewing PageMart, text, HTML and XML files. For all other file formats (such as PDF, Microsoft Excel, Microsoft Word, etc.) the default viewer (or associated application) installed within your browser or on your computer for that specific file type will be used. For file types such as Microsoft Excel and Microsoft Word, you may have the option to immediately save the file to an alternate location for subsequent viewing or to open the file within the Content Area, depending on individual browser settings.
While Report2Web will make use of third party viewers when applicable, the way in which those viewers will open is not always under the control of the application. For example, in some releases of Microsoft Office, when accessing a document from a web page, the default behavior of Microsoft Office applications is to open the selected document within the browser. Within other versions of Microsoft Office, default behavior is to open within the actual application (outside of the browser). In this example, as Report2Web makes use of the default third party settings, you will need to make changes on your specific computer to modify the default viewing behavior if desired.
Working with Report Versions
Often, multiple iterations, or versions of the same report are published, creating a new instance of the report each time it is generated (e.g. weekly, monthly, yearly). Documents with the same file name but different timestamps are distinct versions of the same report or publication. For ease of use, the most recent version of a given report is displayed within a list view. To view the most recent version of a report, click on the report Title link. For those reports that have more than one version, a plus sign is placed over the File Type icon. To directly view a list of historical report versions, click on the File Type icon to display the Versions list tab.
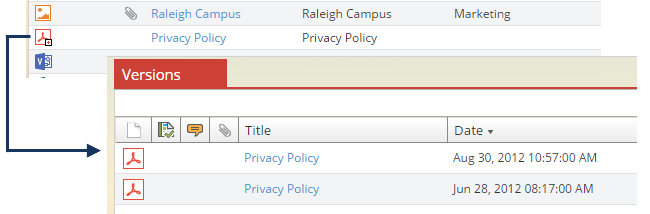
When viewing a report, if additional versions exist, you can easily navigate between versions by clicking on the left and right arrows at the top of the Report Viewer Toolbar. Hover the mouse over the arrow to display the date/timestamp of the next or previous version. As you move from version to version, the displayed report date will change to reflect the appropriate version of the report. Clicking on the Version list link will bring you back to the Versions tab as shown previously.

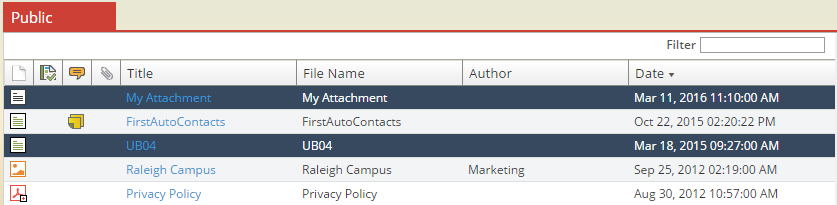
Viewing Multiple Copies of the Same Version
Documents with the same file name but different timestamps are distinct versions of the same publication. In some cases, when a user copies or moves a document to a target folder that already has the exact same file name with the same timestamp, like the way Windows handles multiple copies, a secondary copy of the version will be created. In this instance, the Title is appended with a copy number in parenthesis.

Multi-selecting List Items
Within any of the Report List views, you can multi-select reports to take action on. For example, you may wish to e-mail several reports to the same e-mail address. Industry standard point-and-click methods are available for multi-selecting reports. To select several sequential reports, click on the first report line, hold down the SHIFT key and click on the last item to be selected. All items that have been selected will be highlighted in blue. To select (or deselect) individual report displayed within the same list view, hold down the CTRL key and left-click on the report line you wish to add or remove from your selections.
The Report Viewer Toolbar
Regardless of the type of document you are viewing, the Report Viewer Toolbar is always accessible, providing quick navigation and access to multiple report formats.
The Title Tab
The name of the currently open report (or folder) will be displayed as the name of the tab. When more than one report is open, you can quickly navigate between reports by clicking on the appropriately named tab. The ability to open multiple tabs is an option accessed by the right-click menu.

Folder and Report Navigation
After you have finished viewing a given report, you might want to view other reports that are in the same folder or in one nearby. There are a few ways to get back to the original list of reports that you were working from:
-
Click on the appropriate folder name within the Folder Menu Pane
-
Follow the Breadcrumbs on the Report Viewer Toolbar
-
Navigate within a folder list using the Previous Publication and Next Publication icons
Located in the upper left corner of each tab, the breadcrumb Path will provide you with quick navigation back through each level of the folder tree that you have followed. Click on the desired root folder or sub-folder name to immediately view a list of all reports contained within it.
To view the next or previous report within the current folder, click Previous Publication (up arrow) or Next Publication (down arrow)  as appropriate. When not applicable, the up and down arrows will be greyed out to indicate the beginning or end of a list.
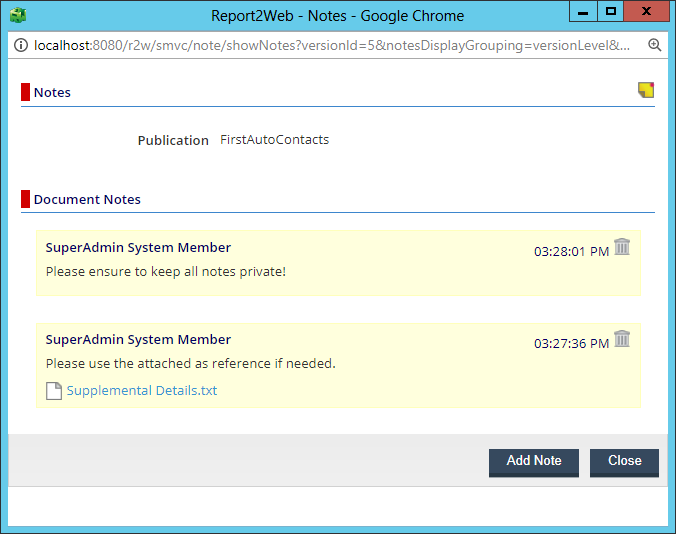
Adding and Viewing Document Notes
Document Notes provide a method of adding additional commentary and/or supplemental files to a published document. Document Notes are associated to a document in general and are accessible from both the Report List View as well as from the Report Viewer Toolbar while viewing a document. Anyone that can view a document can view its associated Notes, however, to add additional Notes you must have been given the appropriate security authorization.
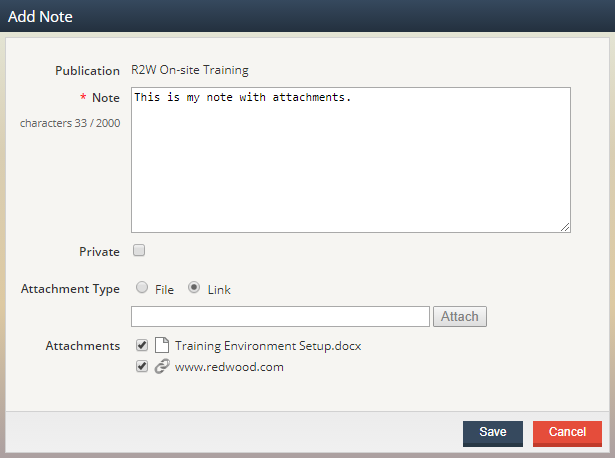
If you are authorized to add Notes, you can do so from the Report Viewer Toolbar, by clicking on the Notes icon. If there aren’t yet any Notes associated with the document, the Notes icon will be displayed with a red star.

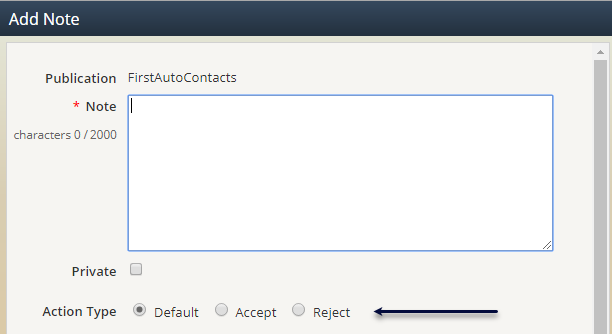
Type your comments in the Note text field (a required field). If you want your note to be visible to all users that can view the document, simply click the Save button. If you want your note to be visible only to you (and the System Administrator), check the Private option before clicking the Save button. To disregard any comments added, click the Cancel button.
Once a Note has been added, the Note icon will be displayed without the red star and will also be added to the Report List View. To view a Note, again click the Notes icon and a comprehensive list of all Notes will be displayed. Additional Notes can be added via the Add Note icon at the top of the Notes dialog or by clicking the Add Note button at the bottom of the dialog.
If appropriately authorized, you can add attachments when adding a Note. Attachments can be a physical file or a hyperlink. If you are authorized to add attachments, when adding a Note, the Attachment Type option will be displayed below the Note field.
-
To upload and attach a file, select the File option and click the Browse button. Once you have selected your file, click the Attach button in the Add Note dialog. You will see the document selected displayed in the Attachments list.
-
To add a hyperlink, select the Link option, type in the desired URL and click the Attach button. Link attachments will also be added to the Attachments list.
After adding all desired attachments (and a required associated Note) click the Save button. To disregard any selected attachments, click the Cancel button.
When viewing the Notes for a document, any associated attachments will appear as clickable links. Clicking on a link attachment will launch the specified URL in a new browser tab. Clicking on a file type of attachment will open the attachment in a new browser tab (if appropriate) or will invoke the appropriate application on your desktop to view the file.
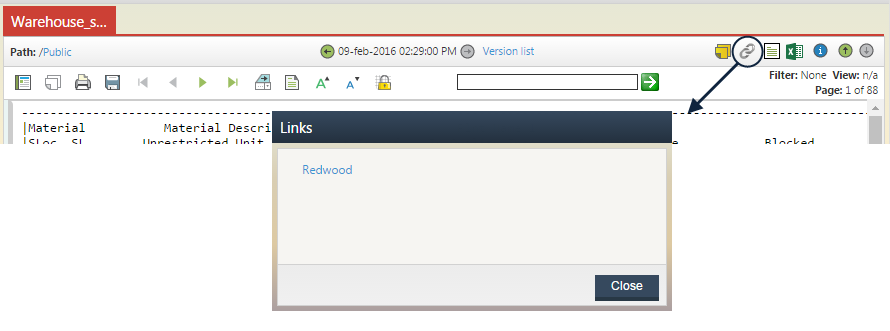
Document Hyperlinks
Depending on your authorizations, you can associate hyperlinks with published documents. Typically, this is done to easily access related web sites or internal applications that are browser accessible. If a hyperlink is available, clicking the Hyperlink icon on the Report Viewer Toolbar will display a list of associated links. Each of the links displayed is a live URL that can be clicked with the results opening in a new window.
Viewing Alternate Report Formats
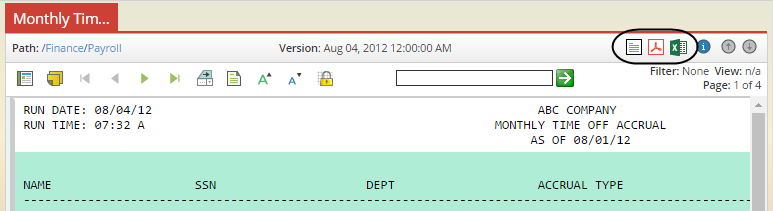
When setting up report processing criteria, administrators may elect to publish a report to in more than one format. For example, data contained in a traditionally static financial report is often more useful when converted to Microsoft Excel. When e-mailing reports, it may be more appropriate to send PDF formats than text files. For each predefined format, an icon will be displayed in the Report Viewer Toolbar. As an example, in the graphic below, the available file types are PageMart, PDF and Excel. Click on the format icon to launch the appropriate viewer in the Content Area.
If you have the appropriate authorization to download content, when right-clicking over one of the displayed format icons, you will have the option to directly download the selected format to your desktop or other specified location.
Opening Documents in Third Party Applications
If appropriately licensed, administrators can designate that a report format can be opened directly within a known third party application. For example, the default behavior when opening a PDF formatted document may be to open within the Adobe Reader browser plug-in, but you may wish to open a PDF directly in Adobe Acrobat for editing. For a given document, if there are any alternate applications associated with the format file extension, and you have the right authorizations, the Open in Third Party Application icon will be displayed. When clicked, a list of targeted applications will be displayed to you for selection.
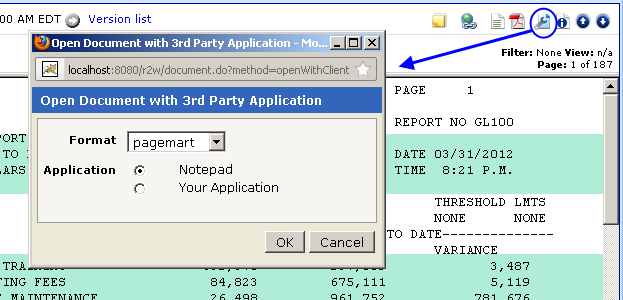
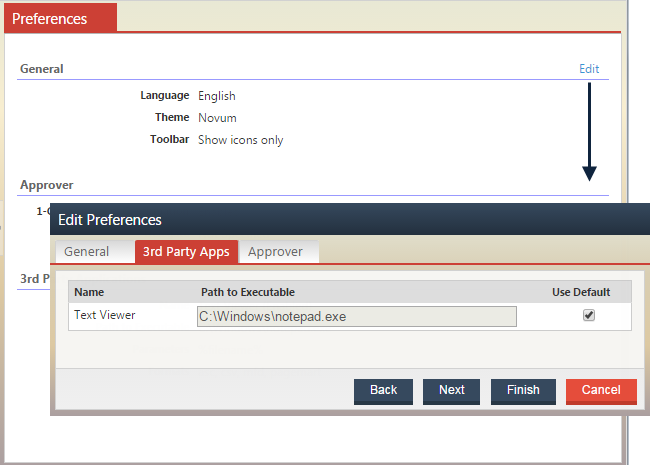
When setting up the association between the third-party application and a document format, your administrator will also specify a default location and executable name to locate the application on your computer. If you have the targeted application installed in an alternate location, click on the Preferences icon on toolbar to modify the third-party application information.
Once opened, a summary of all enabled third party applications will be listed including the name of each enabled application along with the default path to the executable (as defined by your administrator). To modify one or more of these values, click on the Edit link and select the 3rd Party Apps page of the Wizard. Uncheck the Use Default option, provide an alternate path and executable name and click the Finish button.
Viewing Report Properties
Selecting the Properties icon will invoke the Properties Wizard which displays information associated with the selected report. Your security authorization will determine whether you can modify any of the properties displayed. The table below describes the various fields that are displayed on each tab of the Properties Wizard.
|
Publication Profile |
Name of the publication profile applied to the selected report. |
|
Date |
Effective date that the selected report was added to the system. |
|
Expiration Date |
Calculated expiration date of the selected report (based on effective date) as determined by the retention value applied. If the document has an unlimited retention time the value displayed will be “Not specified.”. |
|
Folder |
Folder location of the selected report. |
|
Size |
Original file size of the selected report. |
|
File Name |
Captured file name of the selected report. |
|
Author |
Author (if defined) of the selected report. |
|
Description |
Description (if defined) of the selected report. |
|
Subject |
Subject (if defined) of the selected report. |
|
Keywords |
Displays a listing of the keywords that have been associated with the selected report. Upon selecting one of the keywords, the associated value(s) will be displayed within the Value text box. |
|
Categories |
Displays a listing of all Category indexes that have been associated with the selected report. |
|
Hyperlinks |
Displays the name of any Hyperlinks that are associated with the report. Selecting the name of a Hyperlink will display the associated URL in the text box. |
|
Metadata |
Displays the name of any Metadata tags that are associated with the report. Selecting a Metadata tag will display the associated content in the Value text box. |
|
Retention |
Displays the current retention period associated with the selected report. |
The PageMart Viewer Toolbar
The PageMart Viewer offers you more options to view and work with text-based documents than a standard text viewer would. As such, when viewing PageMart documents, an additional toolbar will also be displayed – the PageMart Viewer Toolbar.

Navigating Between Pages

The PageMart Toolbar provides standard buttons for moving between the first/last and next/previous pages of a report. Also available is the Go to Page button which will prompt you to enter the page number you would like to immediately view.
Changing Report Display Options

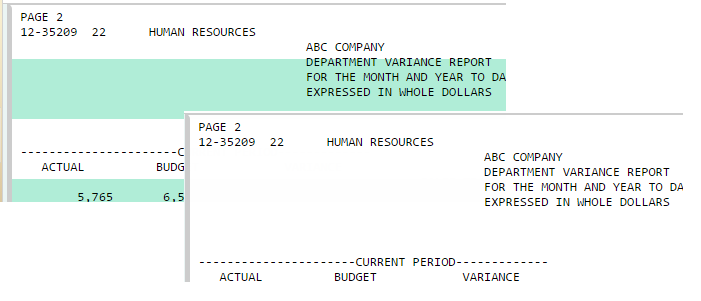
Toggle Background Stripes
The PageMart viewer offers the ability to apply traditional “green bar” stripes on standard text reports to ease the transition from printed to electronic report formats. Clicking this button will instantly add or remove the display of the green bar on the current document. Based on options specified by your administrator, background stripes may or may not be displayed by default.
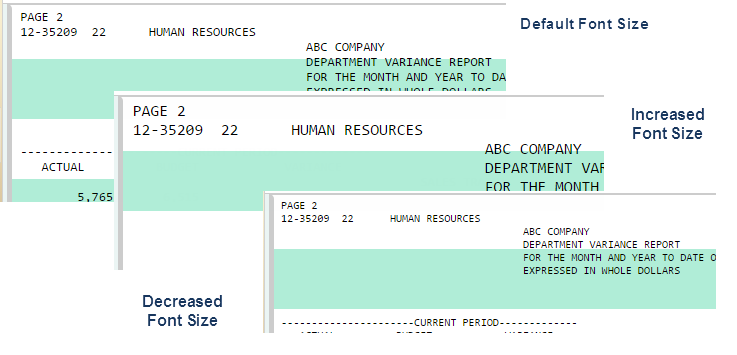
Increase/Decrease Font Sizes
In some cases, you might want to change the font size of a document to make it easier to view. Clicking the Increase Font Size or Decrease Font Size buttons will modify the default font size in small increments. Once modified, the changes will be in effect for the duration of your current Report2Web session. Adjusting the font size while viewing a subsequent report will reset the session default.
Freeze Columns/Rows
When viewing documents that are heavily numeric in nature, it is likely that they are formatted using fixed row and/or column headers. To make viewing documents of this type easier, you can lock in a fixed number of rows or columns to stabilize heading information while scrolling through the remainder of the document.
Clicking the Freeze Columns/Rows button will prompt you to specify the exact number of rows or columns to stabilize during the scrolling process. Note that this setting is only maintained for the currently viewed document.
To remove any frozen columns or rows, again click the Freeze Columns/Rows button, choose the Do not freeze columns or rows option and click the OK button.
Report Filters
When setting up report processing criteria, administrators may elect to publish PageMart reports with embedded index information known as a Filter, which provides an intuitive way of drilling through report data without having to page through the entire document. The Hide/Show Filter pane toolbar button reveals all available Filters for a report. Click on the blue arrow next to the Filter name to display the list of values associated with a Filter. Each value is hyperlinked and will immediately filter the display in the PageMart viewer to show only those pages that are associated with the selected value. To clear an applied Filter, from the Hide/Show Filter pane, click the None link.
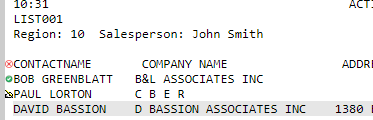
The upper right corner of the PageMart Toolbar provides a visual indication as to which Filter (if any) is currently applied, which value (or view) is being displayed and the total number of pages included in the current view. In the example below, the Department Name Filter is being applied, displaying the values only for “Training.” Notice also that the total number of pages displayed is significantly decreased from the original report.
As an alternative to the point-and-click method of drilling through report filters and views within the filter pane, click the Search Filters icon located within menu, type in the name of the desired Filter or Filter Value you want to search and click the Search button. The Search Filters Result dialog will be displayed and will list all values that matched your search criteria. Select the desired View and click the Go button.
Line Item Notes
With the appropriate authorization, you can add Line Item Notes with optional attachments to PageMart documents. Unlike Document Notes which are related to the overall report, Line Item Notes are associated with specific line numbers on an individual page of a report. Any number of Line Item Notes can be associated with a given line on a report.To add a Line Item Note, mouse over the targeted line for the Note so that it is highlighted, right-click and select the Add Line Item Note menu option.
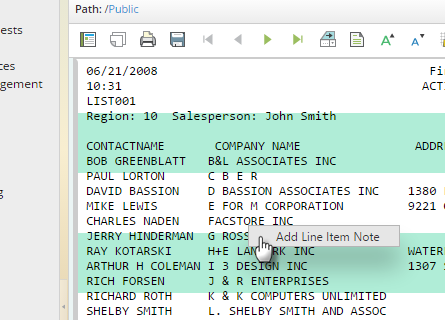
When creating a Line Item Note, an additional Action Type field is available for selection, which controls the icon displayed for each Line Item Note. Possible options are Default (hand), Accept (green checkmark) and Reject (red ‘X’).
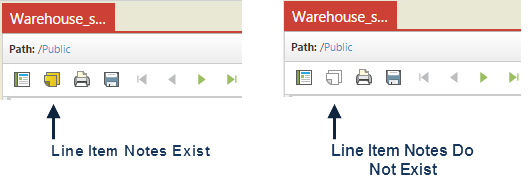
If one or more Notes exist on the currently selected document, the Line Item Notes icon will be enabled (yellow). If there aren’t any Notes associated with the selected document, the icon will be greyed out or disabled.
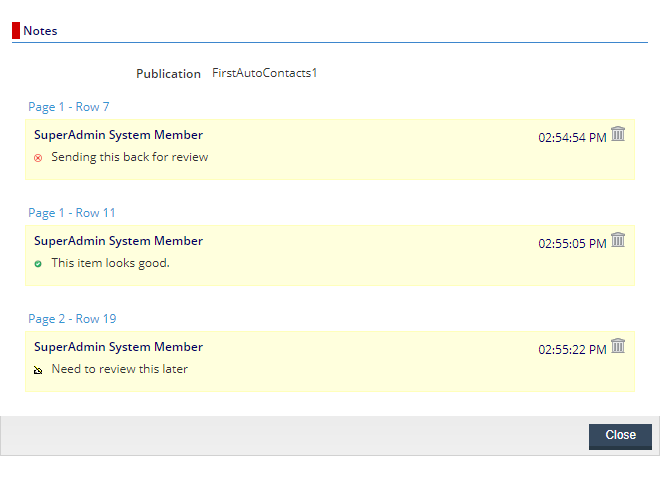
To view all Line Item Notes associated with the document that is being viewed, click on the View Line Item Notes icon on the PageMart Toolbar. For each Note, clicking on the “Page # - Row #” link will take you directly to the appropriate page where the annotation is found.
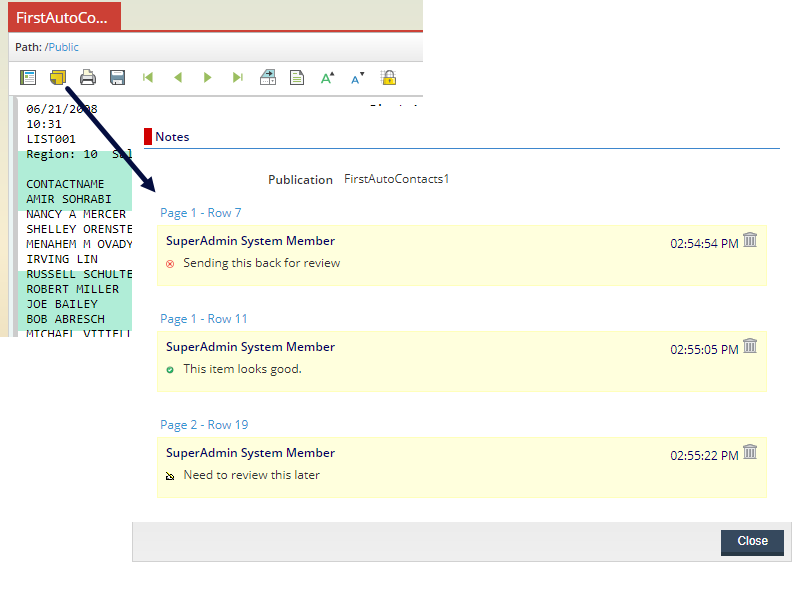
To view Line Item Notes associated with a specific line on on a page the report, hover the mouse cursor over the Note indicator found at the beginning of the line. The Line Item Note icon displayed for a given note is based on the Action Type selected when defining the Note.
Deleting Line Item Notes
With the appropriate authorization, you can delete existing line item notes. If you are authorized to delete a note, the delete (small garbage can) icon will be displayed to the right of the timestamp information as shown below.
Click on the Delete icon and when prompted, click the OK button to delete the note or click Cancel to leave the note as-is.
Printing Reports from PageMart
With the appropriate authorization, the Print icon allows you to print reports to a locally defined printer. Click the Print icon to view the default settings associated with the report. In most cases, the default settings for page size, page range, orientation, font size and margins will be appropriate for printing purposes. However, you may alter these defaults within the Print dialog. Clicking the Preview button will render a sample of the report in PDF format before printing so that you can verify what the printed output will look like before creating a hard copy.
Typical print options such as page size, range, orientation, margins and font size can be specified as well as line item notes and header/footer information.
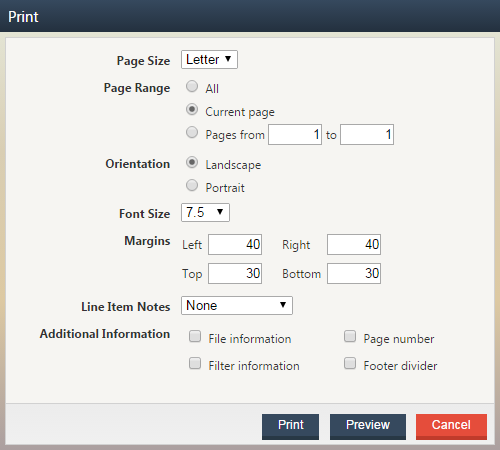
If an administrator has predefined specific settings for printing a PDF file, the print dialog will be pre-populated with those settings. Any manual changes made within the print dialog will override the predefined settings. If there are no specific settings predefined, default settings will be displayed when first accessing the print dialog.
Including Line Item Notes for Print
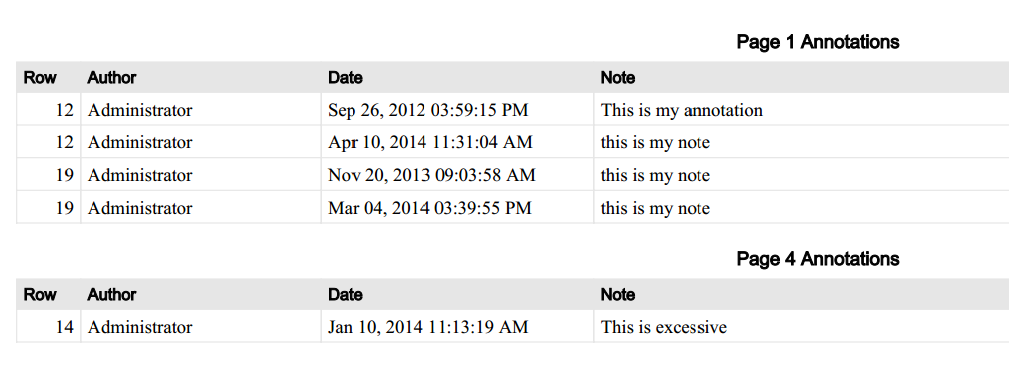
When printing a PageMart report, the option exists to print only thae report content or any associated line item notes along with the report content. Selecting the”at end of page” or “at end of report” option from the Line Item Notes list will generate a cumulative summary of all appropriate annotations on one or more pages as in the example depicted below.
Including Header/Footer Information
File Information, appearing as a footer in the lower left corner of the report will include the title, path and publication date (not the print date) of the report.

Filter Information, also appearing as a footer is located in the lower right corner of the report and will include the name of the currently applied Filter and associated Value.

The Page Number, appearing as a header in the upper right corner of the printed page reflects the page number of the current view of the report – not necessarily the page number of the original report. For example, if the original report contains 50 pages, but a Filter has been applied before printing, the resulting print file may only be 30 pages. In this case, the Page Number would indicate “Page X of 30”.
The Footer Divider places a horizontal line at the bottom of the page directly above any other selected footer information.
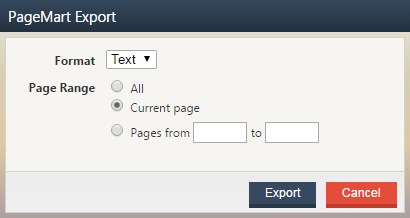
Exporting Reports in PageMart
With the appropriate authorization, you can export documents directly from the PageMart viewer to your desktop using the Export button . When you select the Export button, you will have the opportunity to select which format you want to export the document in (based on enabled conversions associated with the report profile as defined an administator), as well as the desired page range. After making the export selections and clicking the Export button, a prompt will be displayed to open the exported document up immediately or save to the desktop.
In the event that your administrator has defined explicit settings for exporting a PDF file (via the Burster or PageMart Composer), the export process will honor those settings. If there are no explict settings predefined, default settings will be used during the export process.
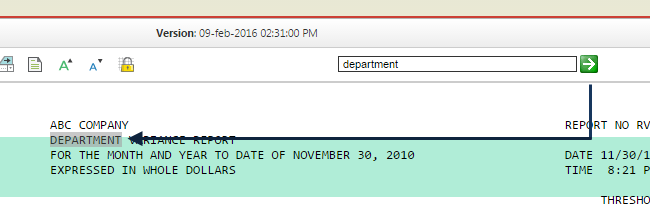
Searching within a PageMart Report
In addition to the many methods of searching for documents discussed later in this guide, the ability to search for content contained within the currently viewed PageMart document is also available. By entering a single search word or a search string in the PageMart Search box and clicking the green arrow button, the PageMart viewer will jump to the first page that the search term/string is found on and highlight the first occurrence. Each subsequent click of the search button will find and highlight the next occurrence.
Working with the PageMart Search Extension
The PageMart Search extension provides a powerful way for users to “mine” content in PageMart reports to isolate key lines of data within a publication or across publication versions. For example, perhaps you are looking to quickly find all lines of the AP123 report that reference a particular dollar amount or invoice number. It may be easy enough to manually review today’s AP123 report to find what you need, but what if you were looking for all instances of that invoice number across the AP123 report for the last year? Suddenly finding that information becomes much more complex.
The PageMart Search will provide you with exactly this type of information, presenting each line of the report that contained your targeted search information along with the date and timestamp of the report version it was found in.
Accessing the PageMart Search
When enabled, the PageMart Search extension will be accessible on the PageMart Toolbar just to the right of the Search within document facility. Clicking on the PageMart Search icon will launch the PageMart Search dialog.
When enabled, the PageMart Search extension will be available within the PageMart Toolbar for all users of Report2Web.

|
Publication Title |
Displays the title of the publication that is to be searched. |
|
Current Page |
Displays the page number that was being viewed when the PageMart Search icon was clicked. |
|
Search Text |
Required text field used to enter desired search string. |
|
Range |
Allows you to select which version(s) of the publication will be targeted by the PageMart Search. The default value selected is Current Version. |
|
Sub-report Options |
Allows you to optionally include a specified number of lines before or after a targeted row in the resulting output file. |
Search Text Options
By default, when the PageMart Search is executed, the search string entered will match any whole or partial word found within the targeted publication. For example, entering a string of “son” would match on that exact value as well as strings such as “grandson”, “Johnson” and “Jacobson.” As such, this type of search, allows for greater flexibility when entering your search string. There may be cases where you want to ensure that only an exact match is returned, in this case, the Whole Word option can be used.
When the Whole Word option is enabled, the search facility will omit any strings that begin or end with a non-alphanumeric character. Essentially, this option inherently restricts the search to alphanumeric characters (A-Z, a-z, 0-9) and the underscore character (_). Any non-alphanumeric characters that appear within the string (as opposed to beginning or end) will be ignored for search purposes.
To further illustrate search results with and without the Whole Word option enabled, see the examples in the table below which illustrates whether or not search results would be found for a given string of report text when using both the default and Whole Word options.
|
Searching with and without the Whole Word option |
|||
|
Report Text |
Search String |
Default Search click? |
Whole Word Search click? |
|
$123.45 |
123.45 |
Yes |
Yes |
|
$123.45 |
$123.45 |
Yes |
No |
|
$123,456.78 |
123,45 |
Yes |
No |
|
123.45- |
123.45 |
Yes |
Yes |
|
123.45- |
123.45- |
Yes |
No |
|
($123.45) |
123.45 |
Yes |
Yes |
|
($123.45) |
$123.45 |
Yes |
No |
Search Range Options
When determining the span over which the PageMart Search should run, you have three options to choose from: Current Version, All Versions and Versions by Date. Each option is described in detail below.
Current Version
Selected by default, this option will search only the currently viewed version of the publication. Optionally, the Search from current page onward option can also be selected. If selected, the PageMart Search will execute from the Current Page number forward through the end of the report. If unselected (default), the PageMart Search will execute from page 1 of the report, regardless of the Current Page.
All Versions
When selected, the All Versions Search Range option will perform the PageMart Search against the current and all historical versions of the targeted publication. Note that this is limited to all versions of the publication that reside within the currently selected folder.
Versions by Date
When selected, the Versions by Date Search Range option will allow the user to restrict the PageMart Search to a subset of versions for the targeted publication. Specifically, the following options are available:
-
Predefined Selection List which includes options for Today as well as the Past 7, 14, 21, 28, 90, 180 and 365 days.
-
Past X days, where X is a value entered by the user.
-
Specific date, where the date is selected using the calendar.
-
To and from dates, where the dates are selected using the calendar.
Sub-report Options
There may be cases where additional information found within the rows that precede and/or follow a ‘click’ row may be of benefit to you. By default, the PageMart Search will return only ‘click’ rows of the targeted version(s) of a given publication. If additional row information is desired, you can specify a number of rows to include before or after the ‘click’ row by populating the Include X rows before search text in output and Include X rows after search text in output.
Viewing PageMart Search Results
After clicking the OK button within the PageMart Search dialog, the search results will be compiled and presented to you as a text file that is opened, taking over the PageMart Search dialog. Each targeted click line of data is separated by a blank line as depicted below.

Interpreting Date and Timestamp Information
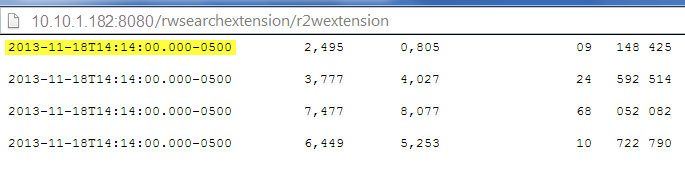
As it is commonplace to have the PageMart Search query many versions of a given publication, it is critical that you know what date each line of resulting data is associated with. To facilitate this, in addition to all data from each targeted click line (and optionally lines before and/or after the targeted click line of data) the timestamp associated with the publication is also displayed at the beginning of each line. Date information is emitted in the ISO 8601 date and timestamp format. Specifically, the format is as follows:
YYYY-MM-DDThh:mm:ss.###-####
Where:
-
YYYY = four-digit year
-
MM = two-digit month (01=January, etc.)
-
DD = two-digit day of month (01 through 31)
-
hh = two digits of hour (00 through 23) (am/pm NOT allowed)
-
mm = two digits of minute (00 through 59)
-
ss = two digits of second (00 through 59)
-
###-#### = indicates the Coordinated Universal Time (UTC) offset
Including Lines Before and After Search Text
Within the PageMart Search dialog, when electing to include lines before and/or after the search result text, the resulting output will consolidate related lines together, separated by a blank line. As an example, in the screenshot below, a search string of “ON-SITE MAINTENANCE” was specified along with one (1) line after the search text.

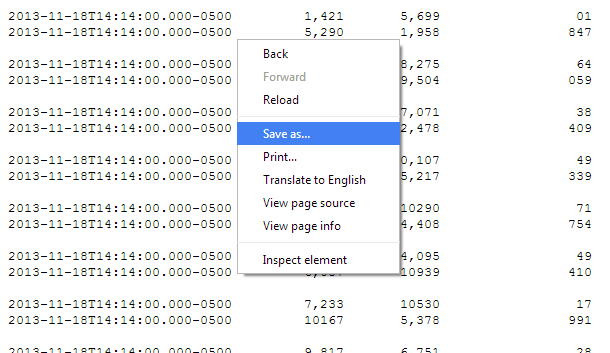
Saving PageMart Search Results
In the event you wish to download search results to your local workstation, place the mouse cursor over the search result text, right-click and choose the Save As option. Note that depending on your specific browser, the right-click | Save As option may vary in its label and functionality. For example, in Chrome this is commonly seen as “Save As” while in Firefox it is referred to as “Save Page As.” From an Internet Explorer browser, depending on the version you are using, you may have the ability to copy text, save text and/or convert to an alternate format.
Right-Click Options
To make navigation and usability as convenient for you as possible, many commonly used features are just a right mouse click away. Right-click options are available for both end user and administrative features and are restricted by security authorizations. Administrators will determine which options are available to you. Right-click menu options are context, authorization and content access based, meaning that depending on where you are within the application, and your specific rights, right-click options will change to reflect appropriate functions.
Common Right-Click Options
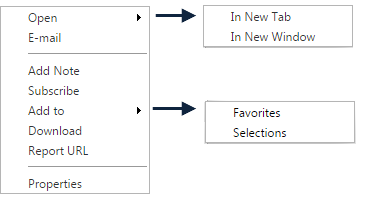
In this section, we will cover the options that are most commonly given to end users. When viewing documents in any list view, typical right-click menu options include: Open, E-mail, Notes, Subscribe, Add to, Download and Report URL and Properties. Each is described below in detail.
Right-click options can also be accessed using the keyboard by pressing the SHIFT + F10 key combination and then pressing the TAB key. Keyboard navigation up and down within the menu options can be done by using the TAB key to move down the list and SHIFT + TAB to move back up the list.
Opening Reports
Any document can be instantly viewed by clicking on the Title of the document within a list view, opening the document within the current tab. There may be cases when you wish to have multiple documents open at the same time, which can be accomplished via the right-click Open menu. When first accessing the Open menu, you are presented with two sub-menu options: In New Tab and In New Window. Most commonly, users elect to view documents in unique tabs so that navigation between reports is easier.
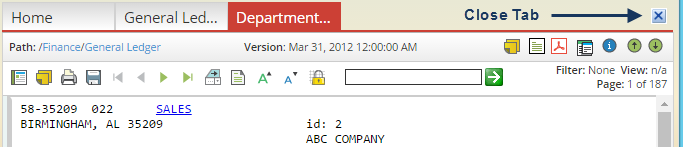
To close a document that has been opened in a new tab, click the Close button button, found on the right hand side of the toolbar.
The Open in New Tab option is also available from the right-click menu within the Folder menu pane. However, as the context is an entire folder rather than a single document, the list of all documents within the targeted folder will be displayed in the new tab.
E-mailing Reports
One of the many authorizations that administrators can enable for you is the ability to send documents to other users (internal or external) via e-mail. To send to an internal user, click on the Specify e-mail recipients icon and then chose the desired recipient(s). You can also manually enter an e-mail address for any recipient in the To and CC fields. The Include as list allows you to specify whether the e-mail will include only a link to the document (appropriate for internal users), a physical e-mail attachment or both the link and the attachment. The Template list specifies the layout of the e-mail as well as any additional content that the body of the resulting e-mail will include. Templates are predefined by your administrator.
The screen shot below depicts the default HTML template layout for an emailed report.
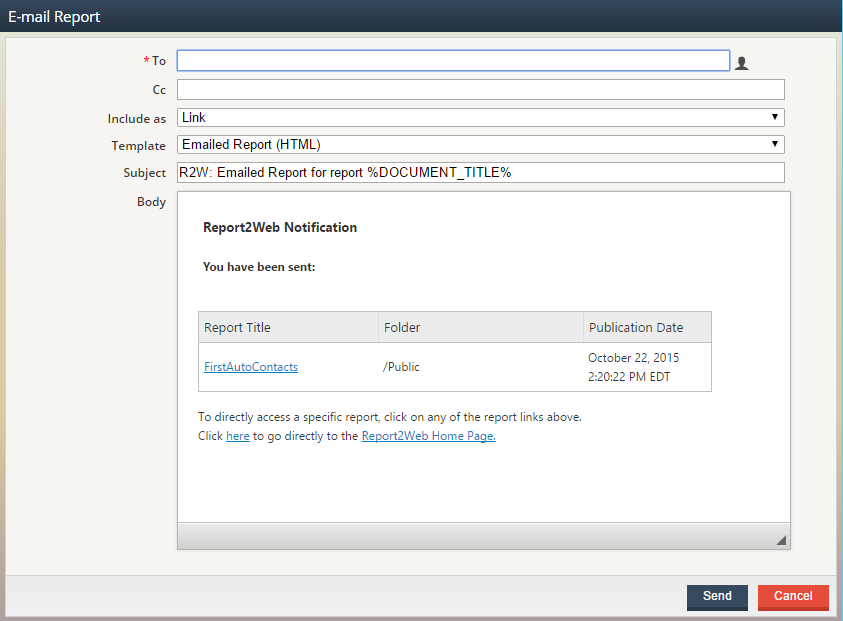
In all cases, the “From” address in the resulting e-mail will the address associated with your user id.
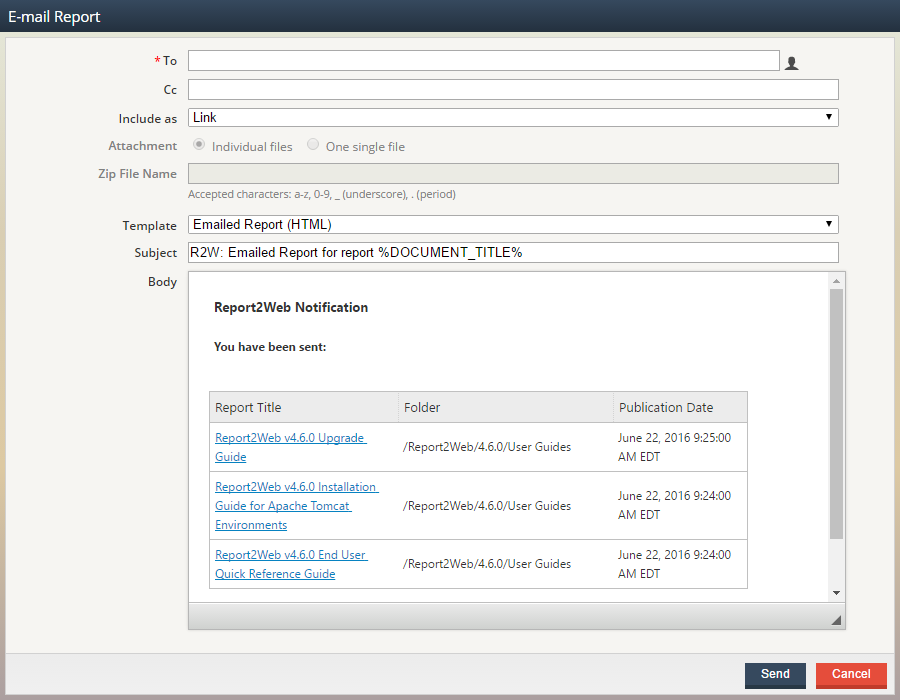
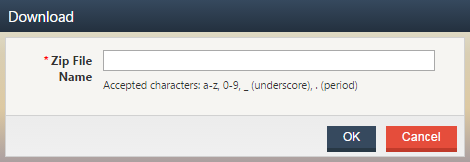
If you have selected multiple documents to e-mail, the E-mail Report dialog will have additional options displayed. If the selected Include As option is Attachment, you will be able to choose whether the selected files will be attached as individual files or as a single zipped file. To leave the files as multiple attachments, choose the (default) Attachment option of Individual files. To zip the files up, select the One single file option and then provide a Zip File Name for the resulting file (no need to add the file extension). When specifying the Zip File Name, the following characters are supported: a-z, A-Z, 0-9, _ (underscore) and . (period).
Subscribing to Reports
Report subscriptions are an easy way for you to be notified via e-mail of newly published reports that are of particular interest to you. For example, you may be entitled to view 20 reports that are published on a regular basis, but perhaps only 10 of those reports are critical to your day-to-day job. For those 10 reports you may elect to enable a subscription so that you will know as soon as they are available. Provided you have the security to do so, you can create subscriptions for individual documents, individual folders (and optionally their subfolders) or all folders within the Catalog. After determining what type of subscription you prefer to create, right-click over the appropriate report , folder or Catalog name, and choose the Subscribe option to display the Create Subscription dialog.
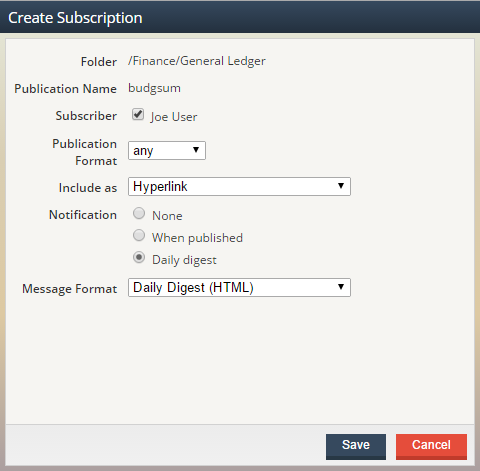
|
Folder |
Folder location of selected report or target folder in which all documents will be subscribed. |
|
Include Subfolders |
If subscribing to a folder, enabling this option will create subscriptions for all subfolders as well as the parent folder. Note this option is disabled (as it is implied) when setting up a Catalog subscription and unavailable with a report subscription. |
|
Publication Name |
Publication name of the selected report. |
|
Subscriber |
By default, this field will display the signed in user as the subscriber. If you have the authorization to create subscriptions for other users, you will see a list of all eligible subscribers. |
|
Publication Format |
Enumerates a list of typical file formats. If desired you can elect to subscribe to reports for a specified format, or simply leave the default selection of “Any” to be notified if any document format is published. |
|
Include As |
Specify whether you wish to be notified with an e-mail link, attachment or both (based on authorizations). |
|
Notification |
Specify whether you would like your notification sent as soon as the document is published, or if you would prefer to hold all notifications and consolidate into a single notification – the Daily Digest. |
|
Message Format |
Allows you to select the format that your e-mail notification will be sent in. Templates for e-mail content are customized by the Report2Web administrator. |
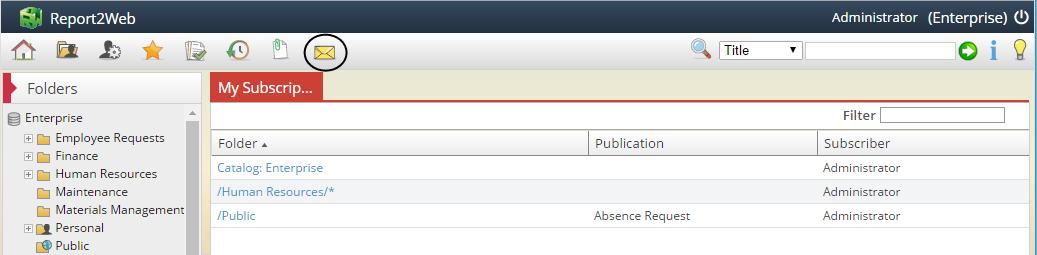
Editing an Existing Subscription
Any subscriptions you already have setup can be easily managed by clicking on the My Subscriptions button found on the Toolbar. Selecting any of the listed subscriptions will bring up the Edit Subscriptions window, allowing you to modify or delete the selected subscription. The graphic below illustrates listings for report, folder and Catalog-based subscriptions respectively.
Adding Favorites and Selections
The Add to option allows you to select from two options: Favorites and Selections.
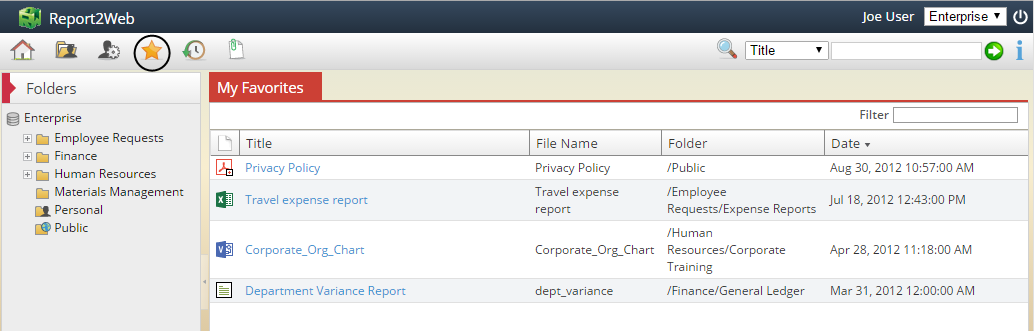
Similar to creating bookmarks within a web browser, Favorites are a way to tag important or frequently accessed documents so that they are easily accessible, without having to navigate through the folder structure or perform any type of search. All items tagged as a Favorite are accessible from the My Favorites button found on the Report2Web Toolbar. While in the My Favorites list, another right-click option is accessible, Remove Favorites, which will delete the selected document from your Favorites list (but not the repository).
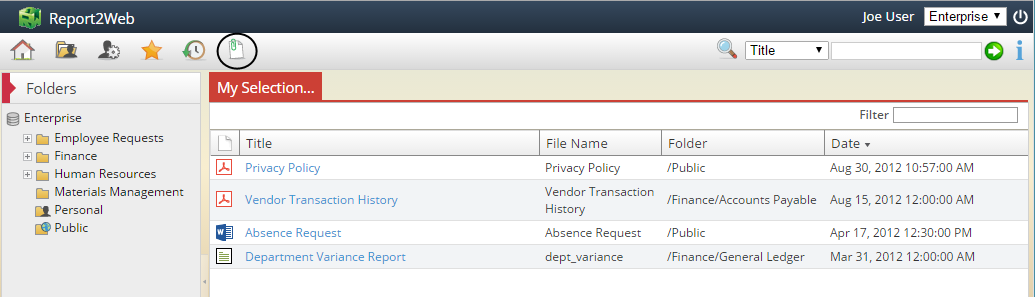
Selections are a collection of reports that have been tagged to take further action on (perhaps in bulk) at a later point in your current session. Sample actions may be to print or e-mail all selected documents at the same time. All selected documents can be accessed from the My Selections button found on the Toolbar.
Downloading Reports
Similar to the Export button found within the PageMart viewer, if authorized, the right-click Download option will allow you to download the selected report directly to your desktop or other network location. However, this option will only download the default format of the document (as displayed in the document list) as opposed to allowing you to select from a list of alternate formats.
If you have selected multiple documents to download, all selected documents will be zipped together as a single file. As such, you will be prompted to provide a Zip File Name for the file that gets created.
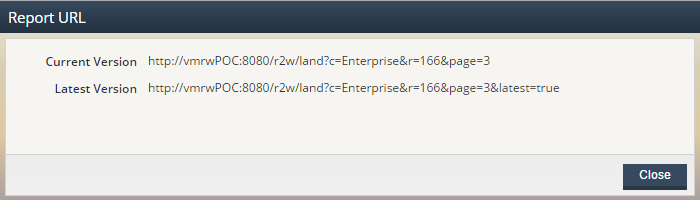
Report URLs
In cases where you would like to publish the location of a document or embed a link to a report (perhaps as a reference) into another document you are working with, select the right-click Report URL option to display the complete URL for a document. When viewed, two URL options will be available. Copy the first URL, Current Version, to provide a link to the specific version of the targeted report. Copy the second URL, Latest Version, to provide a more generic URL that when accessed will always display the most recent version of the targeted report.
Bundling Reports
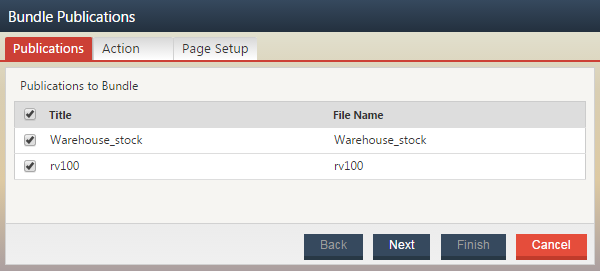
The ability to bundle together text and PDF files is accessible through the right-click Bundle option. All bundles will be created in PDF format, converting text files to PDF as needed. In order for the Bundle option to appear, in addition to having the appropriate authorization, more than one report must be selected within the Report List. Adding reports to your Selections works best if you need to bundle files from multiple folders, as it can collect a large number of reports from various places in your Catalog in one spot.
After selecting your targeted files, right-click over one of the selected files and choose Bundle from the menu. The Bundle Publications wizard is displayed, providing a summary of the Publications you’ve selected. If you see a report in the list that you no longer want to be a part of the bundle, uncheck the box next to its name to omit it from the bundle. When you’re satisfied with your choices, click the Next button to be taken to the Action page of the Wizard.
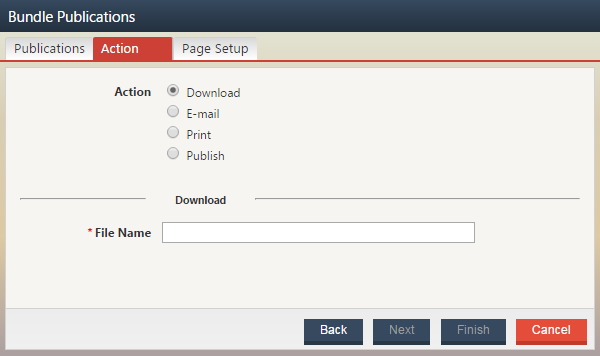
Bundle Actions
The Action page dynamically changes based on the type of action selected. As you choose an action from the top portion of the page, the bottom will display the required and optional fields associated with the selected action type. Available actions include: Download, E-mail, Print and Publish to an existing folder. Access to Bundle action types is based on your individual security authorizations.
Downloading a Bundle
When downloading a bundle, you will be required to enter a File Name. There is no need to enter an extension as all bundles will automatically be created in PDF format.
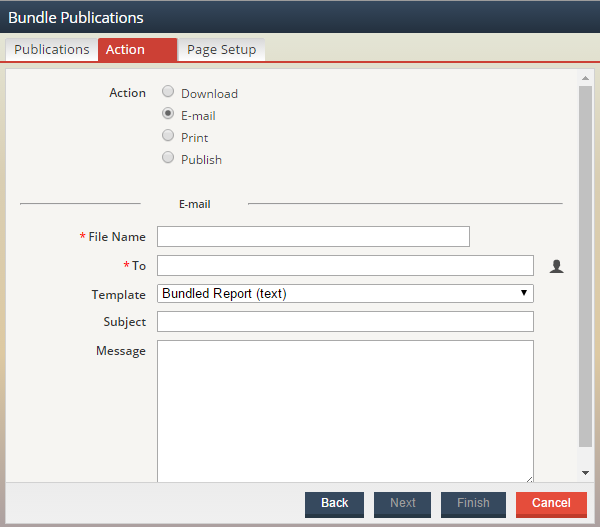
Emailing a Bundle
If you choose to email a bundle, you will be required to enter a File Name as well as manually enter or select the recipients of the bundle (the To field). To select recipients from the user list, click on the Select User icon to the right of the To field. You can also enter an email address directly into the To field. You can also enter a Subject for the email as well as a Message (email body) for the intended recipient(s). The From address in the resulting email will be the address that is associated with your user id. Click Next to move to the last page of the Wizard.
Printing a Bundle
Unlike the other action types, no additional parameters are necessary on the Action page when choosing to print the bundle. All of the formatting options are available on the Page Setup page of the Wizard which is common across all action types. Click Next to move to the next page of the Wizard.
Publishing Bundles to an Existing Folder
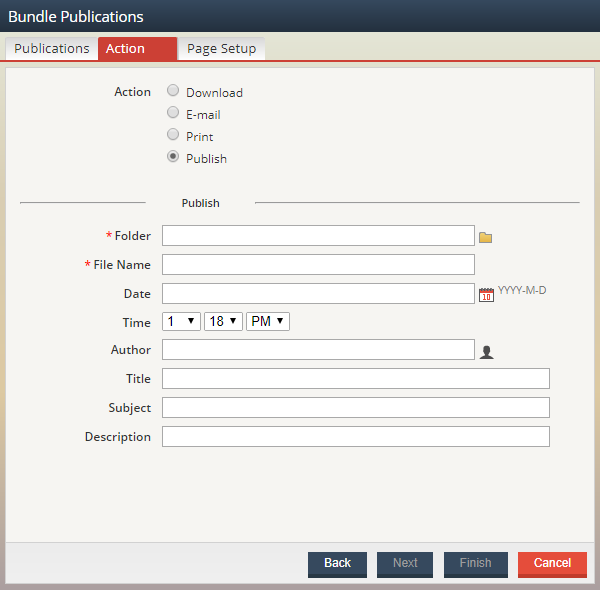
To publish a bundle, you will first need to specify the Folder that you want the file published to, as well as the File Name. Click the Select Folder icon to select the target folder location. If you do not wish to use the default system information that is generated at publish time, you can modify the Date and Time of the report using the calendar icon to manually select a date. Optionally, you can also provide information for the Author, Title, Subject, and Description fields. Click Next to move to the next page of the Wizard.
Bundle Formatting Options
The last page of the Bundle wizard, Page Setup, allows you to control how your bundle will be created. Here, you are given choices related to the layout of your bundle including orientation, fonts and pagenumbers. The Page Number Format field describes how you want the page numbers labeled on the report. The default is “Page %p,” which will produce a page number label like “Page 2.” The “%p” portion is a variable that translates to the actual page number.
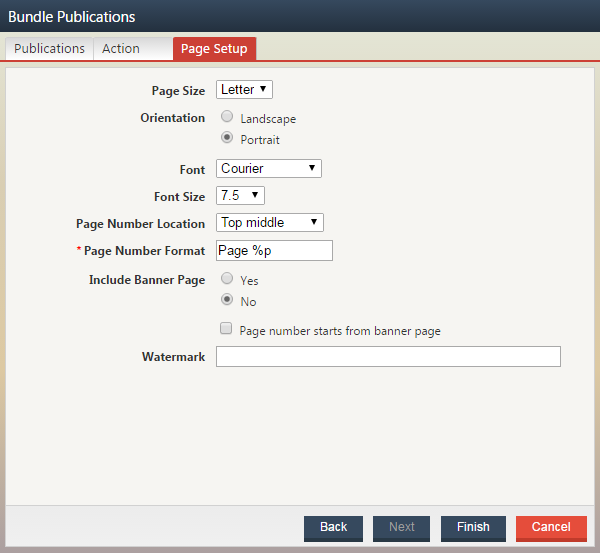
By default, bundles do not get created with a banner page. You can, however, select the Include Banner Page option to have an introductory page attached to the beginning of the bundled file. The banner page, depicted below, will include the date the bundle was created, the total number of reports included in the bundle and the total number of pages contained within the bundle.

Finally, you can add text-based background watermarks to the bundle by filling in the Watermark field. Commonly, this is used to put terms like DRAFT and CLASSIFIED in the background of the file’s text.
Once you’ve configured your options, click the Finish button to create the file and perform the action you’ve specified.
Advanced Right-Click Options
The ability to copy or move documents from folder to folder are considered advanced options as they require additional Content Access rights and Security Authorizations.
With the appropriate security settings, you will have the ability to Copyor Move documents from the following list views: Folder, Versions and Search Results.
When copying or moving from the Folder List View, the entire publication (all versions) will be affected. However, when copying from the Version or Search Results List Views, only the selected versions will be copied or moved as appropriate.
Copying Documents
If you have been given the Copy Content authorization, you will see the Copy right-click menu option when working within a supported list view.
Copying a document leaves the document in its original (source) folder and places a secondary copy in the newly selected (target) folder. In order to successfully execute a copy process, in addition to the Copy Content authorization, you must also have (at a minimum) Read Content Access on the source folder and Change Content Access on the target folder.
To copy a document, right-click over the targeted document and choose the Copy option. Select the targeted folder and click the OK button on the prompt to confirm the document copy. Click the Cancel button to terminate the copy process.
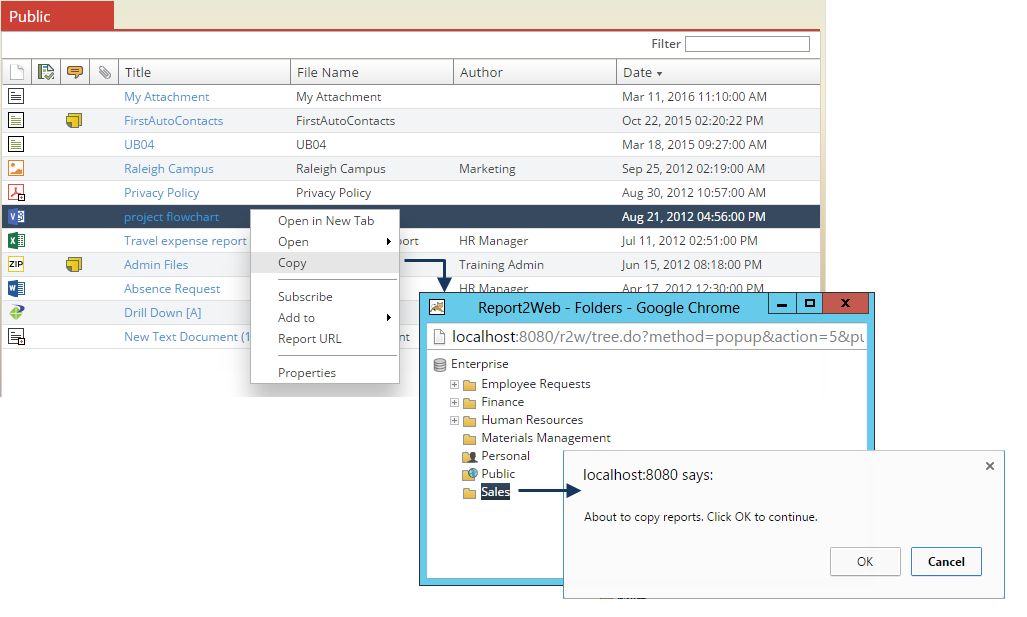
If you select a folder that you do not have Change Content Access for, a message will be displayed indicating that the copy process cannot be completed.
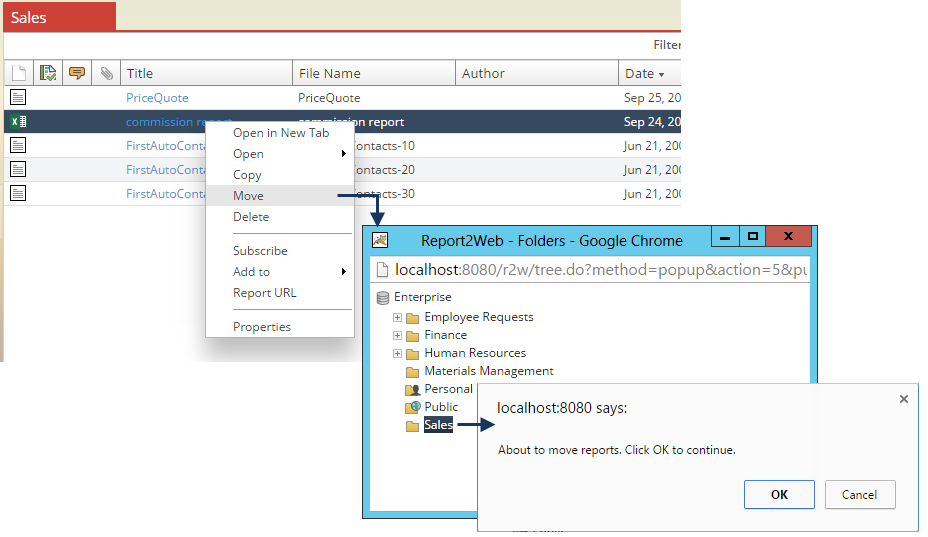
Moving Documents
If you have been given the Move Folder and Move Content authorizations, you will see the Move right-click menu option when working within a supported list view. Moving folders that do not have any content only requires the Move Folder authorization.
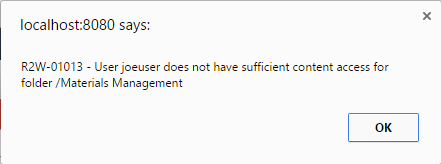
Moving a document removes the document from its original (source) folder and places it in the newly selected (target) folder. In order to successfully execute a move process, in addition to the Move Content authorization, you must also have the Delete Content authorization, Full Content Access on the source folder and Change Content Access on the target folder.
To move a document, right-click over the targeted document and choose the Move option. Select the targeted folder and click the OK button on the prompt to confirm the document move. Click the Cancel button to terminate the move process.
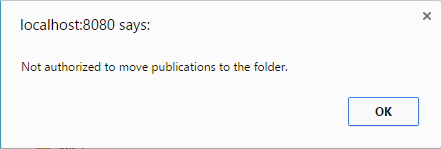
If a target folder is selected and you do not have the appropriate Content Access, a message will be displayed indicating that the move process cannot be completed.
Email Subscription Considerations
If all versions of a publication have been moved from a source to a new target folder, any users that have report-based subscriptions to that publication (as it was in the original source folder) will automatically have their subscriptions updated to reflect the new folder location of the specific publication.
Any Folder or Catalog subscriptions you have will be unaffected, even if all versions of a publication have been moved.
Resolving File Collisions
When copying or moving files, it is possible to have a collision, meaning the document being moved or copied already exits in the targeted folder. A file collision is detected when two documents with the exact same file name and date/timestamp are found. In these situations, a dialog will be displayed, asking you how the collision should be handled.
.
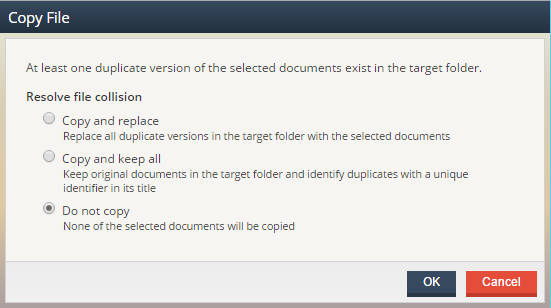
The table below describes the possible collision resolutions:
|
Copy/Move and replace |
Copies or moves the selected file(s), and replaces any existing duplicate files in the target folder with those being copied or moved. |
|
Copy/Move and keep all |
Copies or moves the selected file(s), leaving the duplicate files in the target folder as they are and instead appending a sequential number to the document that is being copied or moved, effectively representing the “copy” number of the file. |
|
Do not Copy/Move |
The default value selected, this option effectively cancels the copy or move process when the user clicks the OK button. |
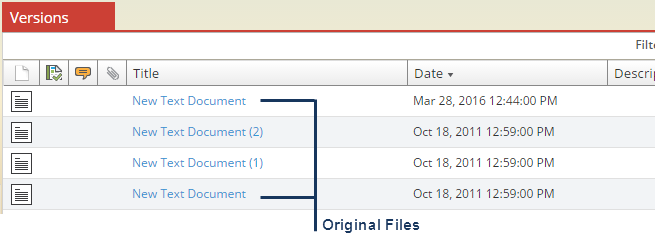
To illustrate how the Copy/Move and keep all option behaves, in the screen shot below, there are three copies of the New Text Document dated October 18 at 12:59 PM, with the copied version having the “(1)” and “(2)” appended to the Title of the report as appropriate, with the most recent copy “(2)” displaying ahead of copy “(1)” and the original in the list view.
Searching for Content
When trying to locate a document, navigating through a folder structure may not always be the easiest way to find what you are looking for. As such, several alternate methods of finding reports are available: Categories, Keywords, Smart Folders, QuickSearch,Using the Quick Search Box and the Search Wizard. In this section, we will discuss the methods of finding reports, how they differ and how they can make report access easier for end users. In order to use any of the search options discussed, you must be associated with a security role that includes the Search Content authorization.
Using Categories to Find Reports
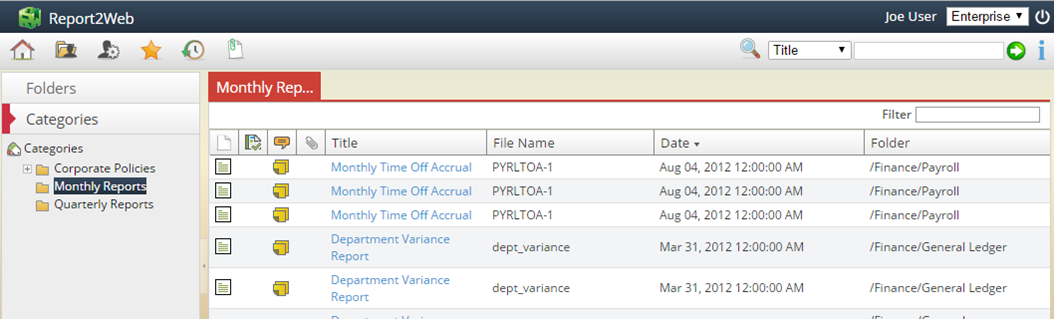
The Categories Menu enumerates logical groupings of reports in a familiar tree-view, based on metadata that has been assigned to the report. Categories offer a quick way to locate reports based on common groupings, regardless of their physical folder location. During the publication process, administrators (or other authorized publishers) define any Categories associated with a given document. Notice in the screen shot below that some documents are categorized as being a Monthly or Quarterly type of report. Click on a Category name to enumerate a list of all reports (based on your security access) that are found within that classification.
Using Keywords to Find Reports
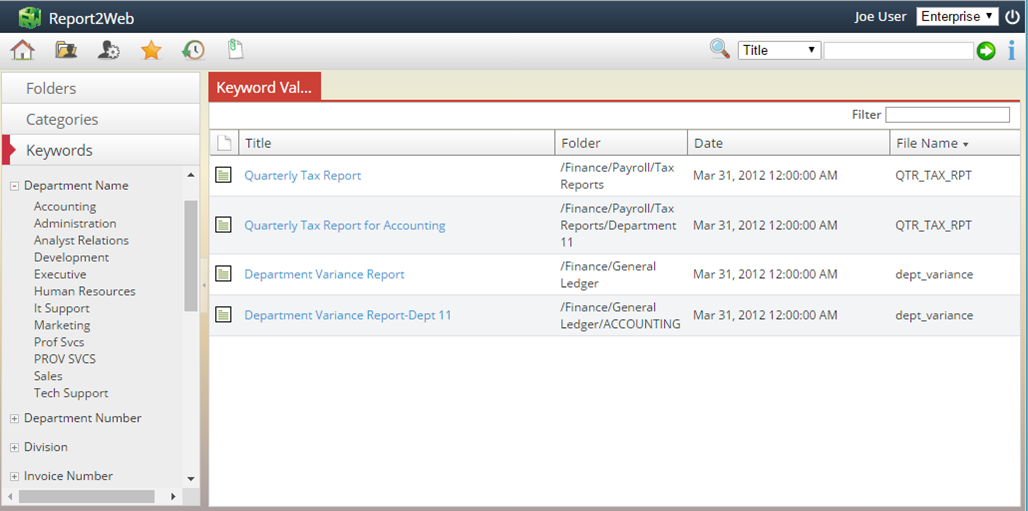
Keywords are similar in concept to Categories, but they represent a more detailed level of identifying values to be associated with a report. For example, while hundreds of documents may be categorized as a “Sales Invoices” only select documents may be associated with a given customer number. Keywords create an easy-to-use index based on specific values found within the report or otherwise associated with it.
The most basic type of Keyword searching (if enabled by your administrator) is accessed from the Keyword Menu. All Keywords are enumerated within the menupane. Clicking on the plus sign next to a Keyword name will enumerate all values associated with the targeted Keyword. Selecting one of the values associated with the Keyword will generate a list of all reports that have been tagged with that value (for which you have the appropriate Content Access rights to view).
General Search Guidelines
-
Searches are not case sensitive.
-
The asterisk (*) character can be used as a wildcard in designated search fields. If enabled by your administrator, wildcard characters may be implied when searching. When entering search criteria, unless the implied wildcard search functionality is enabled, it is assumed that the text you enter represents the beginning of a search string.
-
Opening and closing double quotes ("") can be used in designated search fields to look for an exact, literal string, meaning the words within quotes must be found in the exact order specified.
-
In the Title, Author, Subject and File name search options, the search results are limited to just the specified metadata field selected.
-
The ‘space’ character is used to indicate an OR condition. For example, if an Author’s name is “Joe User” a query using the Author search option for Joe User would not return results as the search is looking for an Author named “Joe” or an Author named “User.” Modifying the search to Joe*User would return results as the search is looking for an Author that starts with the string “Joe” followed by any number of characters and ending in the string “User.”
The table below lists supported search criteria for the Report Title, Author, Subject and File name search options when the Implied Wildcards for Search option is not enabled by the administrator:
|
*monthly* *report* |
Search for reports that include either the word “monthly” or “report” followed by a string of characters. |
|
“monthly sales report” |
Search for any report exactly titled “monthly sales report.” |
|
monthly* |
Search for any report title that starts with the word “monthly.” |
|
monthly*report |
Search for any report title that starts with the word “monthly” and ends with the word “report.” |
|
*sales* |
Search for any report title that includes the word “sales.” |
|
mon* |
Search for any report title that starts with “mon.” Note that in this case, search results could, for example have a title that begins with “monthly” or “monday.” |
Searching with Implied Wildcards
When the Implied Wildcards for Search option is enabled, search behavior is different than when it is disabled and in many cases minimizes the effort needed to find the result you are looking for. This option assumes that the wildcard character is automatically prepended and appended to any search term. As an example, a search for the word sales would automatically be assumed to be a search for *sales*.” Additionally, when implied wildcards are used, two additional operators are available: AND and OR (recognized only when in all capitals). In conjunction with the implied wildcards, this offers you the greatest amount of flexibility when searching.
As an example, suppose the following four titles exist: Monthly Sales Report, Sales Commission Report, My Monthly Report and Department Variance Report. Using the Quick Seach to query by Title, the table below illustrates various search strings and their expected results.
|
Sample Implied Wildcard Search Results |
||
|
Search String |
Implied Search String |
Sample Search Results |
|
monthly sales monthly OR sales |
*monthly* OR *sales* |
|
|
monthly AND sales |
*monthly* AND *sales* |
|
|
sales* report |
*sales* OR *report* |
|
|
sales |
*sales* |
|
|
on |
*on* |
|
|
“sales report” |
*“sales report” |
|
Accessing Previous Search Results
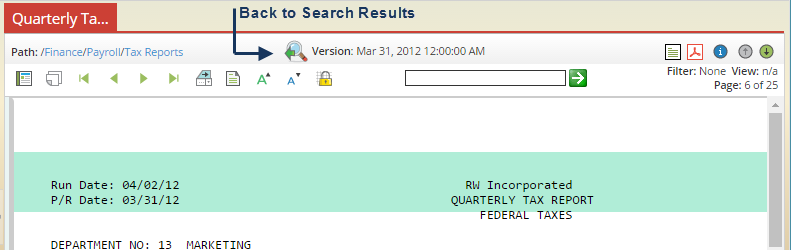
After opening a document for viewing that was initially displayed in a result list from the Quick Search Box, the Search Wizard or a Smart Folder, an additional icon will be displayed on the Report Viewing toolbar. This icon, Back to search results, will bring you back to your previous search result list. Using this icon is preferred over clicking the browser ‘Back’ button as sometimes individual browser settings can result in unexpected behavior.
Using the Quick Search Box
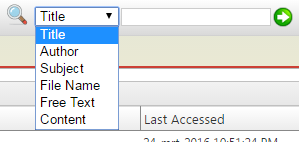
The Quick Search, found in the top Toolbar provides yet another method of searching through all reports in the system. The Quick Search box allows you to query quickly based on predefined metadata fields. To use the Quick Search, select a search type from selection list, enter your search criteria and click by selecting a search type from a dropdown list and click the Search icon. Available search options and their supported syntax are described below.
Using the Content Quick Search Option
The Content search option searches exclusively through the body of any text, PageMart, PDF, HTML, XML, Excel and Word documents to find your specified search term(s). This search option is only available if your administrator has enabled the indexing service within your specific environment. When entering Content search criteria, like other search options, the space character is treated as an implied OR when searching. All other wildcard search scenarios are also supported (with the exception of a leading wildcard character). Should you need to narrow your search to a specific phrase that appears within the body of a report (in the exact order specified), the double quote characters can be used to designate your search string.
The table below shows examples of the additional search criteria supported by the Content search:
|
science department |
Searches for any document where the body contains the word science or the word department. |
|
“math department” |
Searches for any document where the body contains the string math department. |
When viewing search results, keep in mind that while many versions of a given document may exist, only those versions that met the search criteria you specified within the Content search box will be displayed in your results list.
Using the Free Text Quick Search Option
The Free text search option combines the search power of the targeted metadata fields and body content into one, searching all possible fields at the same time. In this type of search, like the basic Content search, all wildcard syntax (with the exception of leading wildcards) as well as the double quote characters can be used in your search criteria. When performing a Free text search, the system interrogates all Quick Search box fields, implying that your search is an OR across all possible fields. For example, a search for the word sales* would query the title, author, subject, file name and content fields, returning results for any match.
Using the Search Wizards
The Search Wizard, accessed from the Toolbar provides an interactive method of doing simple or advanced searches based on document content or metadata.

Separated into two types of searches, the Search Wizard is made up of the Keyword Search Page and the Advanced Search Page. Hyperlinks allow you to switch between the two types of searches. As a convienence, the application will remember the last type of search that you did and show that page of the Wizard by default the next time the Search Wizard is accessed.

When working with either of the Search Wizard pages, it is important to note that in order for the search to return results, ALL of the criteria specified must be true (meaning that results are ANDed together).
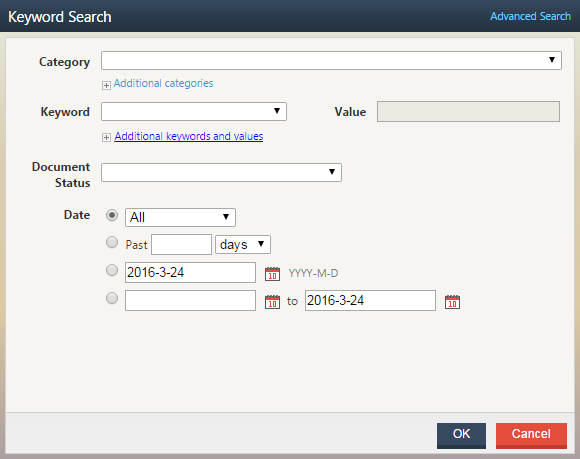
Keyword Search Wizard
The Keyword Search Wizard is designed to let you execute quick, targeted searches without having to be overwhelmed with all possible search fields. You can select up to three Categories, three Keyword/value pairs and a date range when building your query. By default, a single Category and Keyword/value search parameter is displayed within the Wizard. If you need to add additional search options, click the plus button (+) below the appropriate type of search term and two additional fields will be displayed.
When viewing the results from your Keyword search, only those versions of a report publication that actually met your defined search criteria will be returned. For example, if there are 100 versions of the Sales Commission Report, but Salesperson 12345 only appears on 12 of them, only those 12 versions will be returned. Furthermore, when search results include PageMart documents, when clicking the link, you will be taken to the first page on which the search term was located. For PDF files, if an administrator has defined PDF Bookmarks to correspond with Keyword name and value pairs, when opening the document, you will be taken to the first page on which the PDF Boomark equivalent of the Keyword/value is found.
Advanced Search Wizard
When a more detailed type of query is needed, the Advanced Search Wizard provides a single interface to query on all document content as well as metadata. The Advanced Search is broken down into two pages: General and Categorization. The Categorization page provides access to Category and Keyword searching as described above in the Keyword Search Wizard section. The General page however, provides users the option to create a search based on all other metadata (e.g. title, subject, description, etc.) and document content. Users can specify criteria on any of the pages of the Advanced Search Wizard and then click the Finish button to execute the query.
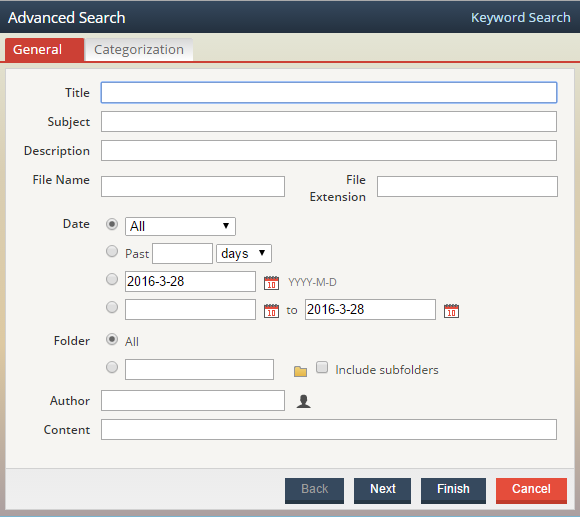
As described in the Quick Search box options, wildcard (*) characters and double quotes (“) for string searching are supported in designated fields. In general, all criteria entered into the search Wizard must be true in order to retrieve a result set, however, values entered in the Content field are still treated as an OR if separated by a space and not enclosed in quotes. As an example, in the screen shot below, the resulting search would look for all documents where the title begins with “time” followed by a string of characters, the word “off” followed by any string of characters AND within the content of the document, the words “marketing” OR “finance” are found.
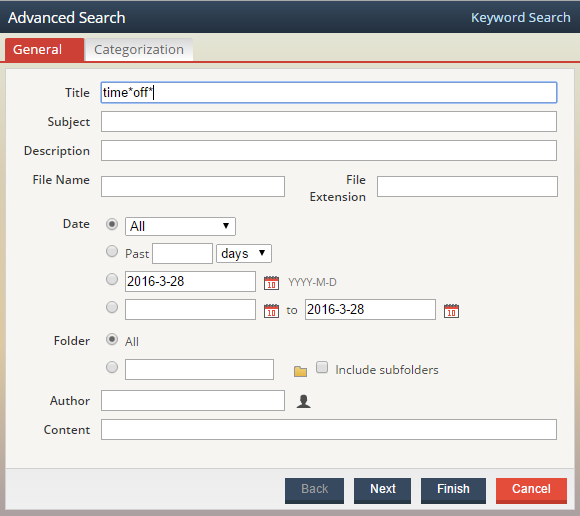
The table below details the various fields on which a user can query within the Advanced Search Wizard.
|
Title |
Searches Report Title field. Supports explicit match or wildcard (*) searching. |
|
Subject |
Searches Subject metadata field. Supports explicit match or wildcard (*) searching. |
|
Description |
Searches Description metadata field. Supports explicit match or wildcard (*) searching. |
|
File Name |
Searches File name field. Supports explicit match or wildcard (*) searching. |
|
File Extension |
Searches for specified file extension (do not enter the “.” Character). |
|
Date |
Searches for a pre-defined date range, a specific number of hours or days, a specific date or a date range. |
|
Folder |
Searches for items found only in the targeted folder (and optionally sub-folder) name specified. |
|
Author |
Searches Author metadata field. Supports explicit match or wildcard (*) searching. |
|
Content |
Searches the body of any text, PDF, PageMart, HTML, XML, RTF, Excel or Word document. Supports wildcard (*) searching. Search terms separated by a space are treated as an OR unless enclosed in double quotes (“) in which case the entire phrase must be found. This option is only available if the indexing service has been enabled on the server. |
|
Category |
Searches through one or more selected Categories. |
|
Keyword |
Searches through one or more Keyword/value pairs. |
Table 5: Advanced Search Query Dialog fields
Searching with Smart Folders
Smart Folders are a convenient way of building and saving a set of frequently used search criteria. Smart Folders appear in the Folder Tree along side of other content, but actually execute a query when accessed, always refreshing the search results with the latest information based on the saved criteria. For convienence, all users that are authorized to use Smart Folders automatically have an “All Documents” Smart Folder which enumerates a list of all content that you have access to view.
Creating a Smart Folder
If you are authorized to use and create Smart Folders , by right-clicking over the Smart Folder icon within the Folder Menu pane, you will find the option to Add a new Smart Folder. The Add Smart Folder option can also be accessed when keyboard focus is on the Smart Folders parent folder, pressing the SHIFT+F10 keys and then the TAB key.
After selecting the Add Smart Folder option, the Create Smart Folder Wizard will display, allowing you to specify the various pieces of criteria you wish to base your search on. All selected search options are treated as an implicit AND, meaning that search results must meet all of the specified criteria within your Smart Folder.
You will need to specify a name for your Smart Folder. It is suggested that something meaningful is entered to help you remember the types of documents that will be returned by the query. All other criteria available in the Smart Folder is the same as described in the section titled Advanced Search Wizard.
Modifying a Smart Folder
If you wish to modify an existing Smart Folder, select the desired folder name, right-click and choose from the three options presented: Rename, Edit and Delete. Choose the Edit option to add or remove any criteria from your search.
Creating a Smart Folder from a Search
When viewing search results obtained from either the Search Wizard or the Quick Search, it is easy to quickly create a Smart Folder based on the criteria originally specified by clicking the “Add to Smart Folder” icon found at the top of the search results list and providing a name for your search.

Working with Shared Smart Folders
With the appropriate authorization, when creating or editing a Smart Folder, the option to make the Smart Folder public, or available to all users is active. Shared Smart Folders, like the All Documents Smart Folder, will allow individual Content Access to restrict search results, but make the Smart Folder available to all users. Unless you have the appropriate authorization, Shared Smart Folders are considered ‘Read Only’ in nature and can not be edited or deleted.
Smart Folder Names have a 255 Character limit.
Approval Based Searching
If you are associated with a security role that includes the Approval Participant authorization, you will have access to an additional page in the Advanced Search and Smart Folder wizards. This page allows you to include participant and/or approval status of a given action item in your search criteria.
Accessing Approver Search Criteria
Approver search criteria can be found on the Approver page of the Advanced Search wizard or via the Approver page of the Create/Edit Smart Folder wizard.
Searching by Status
The Status field on the Approver page is used to search for action items based on their current status. Available Status options are: Approved, Hold, Pending and Rejected. When searching by Status (or Participant), the Pending Participant as well as the current status may be included in your search results, depending on settings established by the administrator. The example below is a simple search for all documents with a Pending status. Notice that the administrator has enabled the Approval Status and Pending Participant values in the Search Result List View.
In cases where an action item has been delegated to another Participant or forwarded to another Participant, a visual queue will be displayed next to the Participant’s name (as in the HR Manager above). The Participant column will always display the name of the original Participant that the action item was queued to. Hover over the Participant’s name to view the details regarding any forward or delegation activities.
As an example, hovering over the Administrator's name below shows us that they were forwarded the action item from Mr. Controller.
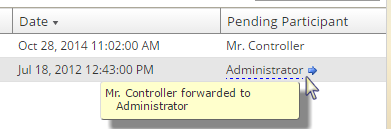
Searching by Participant
If you wish to restrict your search to approval statuses associated with a specific participant, in addition to selecting the Status in the Participant field, enter the name (or part of the name) that is associated with the targeted participant. Note that the Participant field is treated as any other text-based search field so wildcard support (*) manual or implied is supported.
Sorting Search Results
Whether via the Quick Search, Search Wizard or Smart Folders, when opting to click on a column header, you can resort your search results. By default, the sort order of all search result sets is descending, by date (unless modified by your administrator). When resorting your results, note that the sort logic is applied to all items contained within the result list – independent of the maximum number of items your administrator has allowed for search results. In the event that your search result set exceeds the defined limit, resorting your search results may not return the same set of reports.
For example, suppose the maximum query limit is established at 200 and your search result set actually contains 300 items, changing the sort to display the oldest documents first would not include the first 100 documents seen in your previous result set as they will be sorted at the bottom of the list and the 200 limit would truncate them from your displayed results.
Web Publishing Documents
Publishing documents directly from within the application to a specified folder location is a straight-forward process. The ability to do so is based on security authorizations assigned to you by the administrator. Publication of documents can be done directly from the user interface – known as Web Publishing or through the Personal Publisher – a desktop-based publication utility. While both options allow you to store publish documents, the Personal Publisher is a more robust tool and with the appropriate licensing options, allows you to directly scan images into the repository as well. If you need to apply Keywords and Categories during an ad-hoc publication process, it is recommended that the desktop-based Personal Publisher be used.
To be able to web publish a document to an existing folder, you must be assigned to a Role which has the Publish Content authorization enabled and have Change Content Access for the targeted publication folder (at a minimum). If you need to create a new folder for the targeted publication, you must be assigned to a Role with both the Publish Content and Create Folder authorizations enabled and have Full Control Content Access to the parent folder of the new folder you wish to create.
Publishing to an Existing Folder
To publish documents to an existing folder, select the target folder, right-click and choose the Publish option to bring up the Publish Report window. The following fields are required to complete the publication of a selected document: File, Date (defaults to current day) and Time (defaults to current time). All other fields are optional.
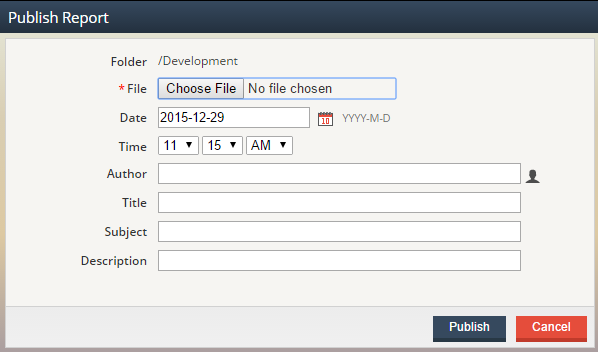
Only one file at a time can be published via the Publish Report window. To publish a new file, click the Browse button, navigate to your targeted file and then click the Open button. In some cases, you may want to change the default publication Date that is associated with the document (e.g. back date a report). To modify the publication Date, click on the Select Date icon (calendar) and using the Previous Month and Next Month buttons, navigate to the desired month and click the targeted calendar date.
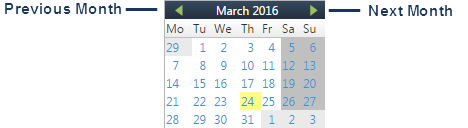
If desired, you can associate additional metadata with the document by entering data in the Author, Title, Subject and Description fields. As discussed in previous sections, these fields can be subsequently used when searching using Smart Folders.
To complete the publication process, click the Publish button.
Publishing to a New Folder
If you want to publish your document to a new folder, first select the top level folder that your new folder is to be associated with, right-click, select the Add Folder option and enter an appropriate Folder Name. Folder Names can be a maximum of 255 characters and cannot include any of the following characters: \/:*?"<>|. You can also provide an optional Description that users will be able to see as a tool tipwhen hovering over the folder name within the Folder list. If a Description is not provided when a folder is created, the tool tip will default to the folder name itself. If specified, the hover will display the provided Description. Descriptions can be a maximum of 255 characters and cannot include any of the following characters: \/:*?"<>|.
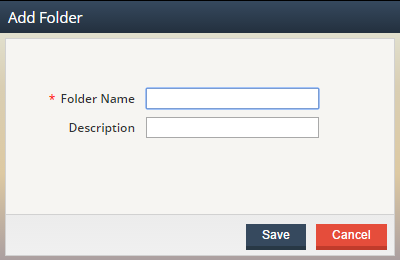
After your new folder is created, select the folder, right-click, choose the Publish option and continue as described in the previous section.
Working with Action Items
The Approver is an optional module that facilitates document-centric approval processes within the application. Once initiated, an approval process queues a document, known as an “Action Item”, to a predetermined list of users or groups for review. Users (known as Participants) can then review the document, comment on it, accept it to be sent on to the next participant and ultimately apply a final approval or rejection to the document. Of course, during any given approval process, alternate paths can be taken where the action item is forwarded to other individuals for additional feedback, delegated to an alternate user or even rejected – terminating the entire approval process.
Key Approver Concepts
Approver Templates
An Approver Template defines the default Members and actions that will be executed during a given approval process. Approver Templates can be applied to a specific folder, associated with a Publication Profile or initiated on an ad-hoc basis. Modifications to an existing template do not affect documents that have previously used the template.
Approval Process
When an instance of an Approval Template is initiated, it is an approval process within the application. An approval process is considered complete when the in-process document has reached one of two termination states: final acceptance or rejection.
Action Items
Any document that is associated with an active approval process is known as an Action Item. Action items are queued to Members for review and comments during an approval process. Once the approval process is complete, the document is no longer considered an action item, although all approval history and final status will be retained. If you are authorized to participate in an approval process, you will have access to the My Action Items icon, which provides access to your list of pending action items.
Approver Actions
Upon reaching a final, accepted or termination state, several actions can be applied to the document (or action item) on an automated (or ad-hoc) basis. Actions include copying or moving the document to an alternate folder, writing the document out to a known watch directory for pickup by a secondary process (such as the Burster or Router) or simply left as-is in its original folder location.
Approver Participants
Approver Participants are those users or groups that have been granted the appropriate security authorization to participate in a given approval process.
Approver Delegate
Approver Delegates are those individuals that have been selected to act on behalf of an Approver Participant during a given approval process. Delegates can be selected on an ad-hoc basis or can be proactively setup by an Approver Participant (e.g. the participant takes a leave of absence and identifies a delegate to act on their behalf during the leave). Approver Delegates must be associated with a Security Role that includes the Approver Participant authorization.
Approver Delegator
Approver Delegators are those Members that have been granted the ability to select and assign an alternate Approver Participant to act on their behalf during an active approval process. Note this is independent of selecting an automatic delegate from the User Preferences area. Approver Delegators must be associated with a Security Role that includes both the Approver Participant and Approver Delegator authorizations.
Observers
Each defined Approval Template can have one or more parties of interest that may wish to be notified when certain actions occur within an approval process. These individuals are known as Approver Observers. Notification to observers via email is used to let the observer know the status of an action item, without requiring the observer to be a participant in the overall process. Observers do not need to be associated with any Approver related authorizations.
Process Owners
Process Owners are Members that are the individual that has overall responsibility for a given approval process as defined by an Approver Template. While this user may not directly participate in the approval process, they have a business interest in the final status of the overall process. Process Owners can be automatically notified when approval processes reach a termination state. Process Owners do not need to be associated with any Approver related authorizations.
Super Approver
Super Approvers are individuals that have been granted the authorization to see and act on all Action Items. Super Approvers will not only have a personal list of action items to work from but will also have access to an alternate view that displays all in-process action items and who is currently assigned to them. Super Approvers inherently have “View” authorization to all action items, independent of their specific Content Access rights. Super Approvers must be associated with a Security Role that includes the Super Approver authorization (which also includes the Approver Participant and Approver Delegator authorizations).
Approver User Preferences
In certain situations, you may want to grant someone else the ability to automatically act on your behalf for any queued action items. This alternate user is known as a Delegate. As an example, suppose Sally Manager is responsible for approving Vacation Requests, but has an upcoming vacation of her own. Sally can delegate her action items to someone else (let’s say Joe User) while she is on vacation so that requests do not pile up in her absence. To specify an automatic Delegate, from the toolbar, click on the Preferences icon and click the Edit link displayed in the Preferences summary page.
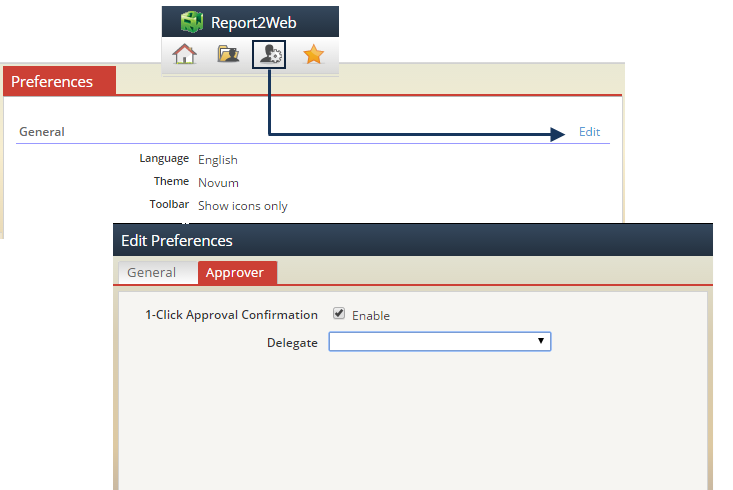
The list of available Delegates to select from will consist of those users that are an authorized Approver Participant. Select a Delegate from the list and click the Finish button. To remove a delegate, choose the first entry in the list – a blank value.
Once you have made your changes, a confirmation will be displayed, indicating your modified preferences will be reflected when you next log in to the application.
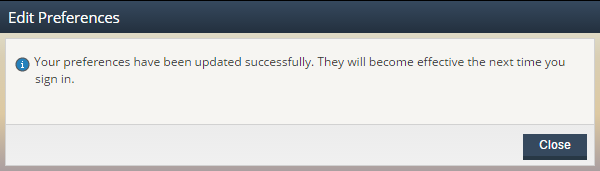
Additionally, if you would like to enable the 1-Click Approval function, you can do so here as well. When enabled, using the 1-Click Approval icon (shown below) will not prompt you for any status changes or notes when acting on an Action Item and will mark the Action Item as ‘Accepted.’

Turning this option off will prompt you for any option notes you may wish to add as well as give you access to view approval history. You can
Approver List Views
Report2Web makes use of several unique “views” within the application to display lists of documents. Throughout the online help, when a view is referenced or depicted in a screen shot, the default values associated with the view are used (e.g. Title, Author, Folder, etc.) as well as default column selections. Depending on Global List View Settings and Individual List View Settings established by your administrator, the default naming conventions, display columns, column order and sort order implemented in your environment may be different than those shown.
My Action Items
To participate in any approval processes or search for documents based on their approval status you must have the appropriate authorizations. Specifically, you must be associated with a security role that includes the Approver Participant authorization. Any document that is assigned to you as part of an approval process is an “Action Item”.
When first logging in, the Home page will display a brief list of any outstanding action items that are currently in your queue under the My Action Items heading. As the name indicates, the My Action Items heading and list view only include those items that are specifically queued to you. From the Home page, click on the title of any action item to view it.
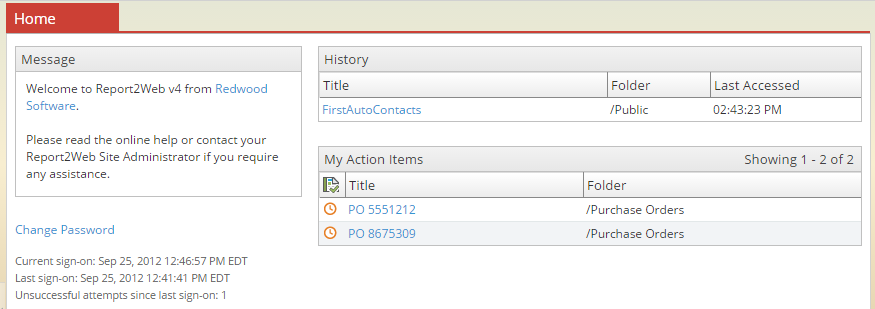
You can also view a list of all your action items by clicking the My Action Items icon from the toolbar. The My Action Items list details not only the titles of each document pending your approval, but its status as well. As with any other list view, clicking on the title of the action item will open it up for viewing.
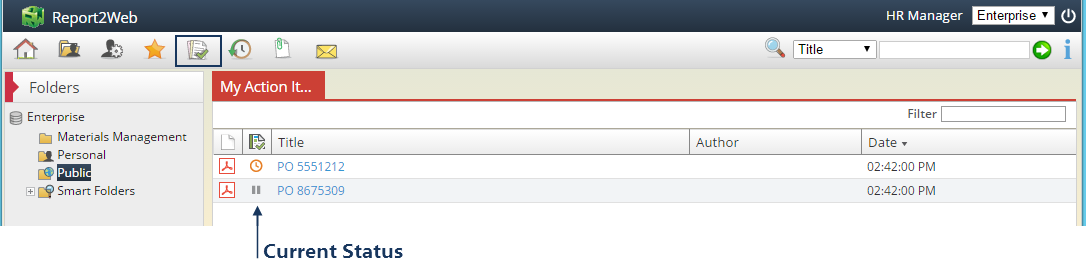
When a document is first published, it is “pending approval.” Status is shown in the Approval Status column of the list view. Possible approval status states include: Pending, On Hold, Rejected, Forwarded and Approved. At each step of the approval process, if you are listed as a participant, depending on the notification options associated with the process, you may receive one or more notifications indicating the status of the action item.
Clicking on the View This Action Item link from an email notification will bring you directly to the view of the action item, within your Action Items list view.
The process of approving a document (or choosing another status) is discussed in subsequent sections, however, it is important to note that once you take an action on a document that terminates the approval process (e.g. reject or final approval), forward the action item to another participant or reply back to a sending participant, the action item is immediately removed from your queue. This is of importance as while an action item is in your queue, you will have implicit Content Access rights to view the action item, once out of your queue, standard Content Access rules apply. In some cases, this could mean that a document you initially approved you can no longer view, as you don’t have Content Access rights to the folder in which it resides.
Quick Approver Dialog
Approving (or taking an alternate action on) a document can be done in several ways. The Quick Approver icon provides you with the option to add comments, view approval history and choose a basic approval action. However, the simplest way to move an action item through the approval process is to use the Quick Action selection list.
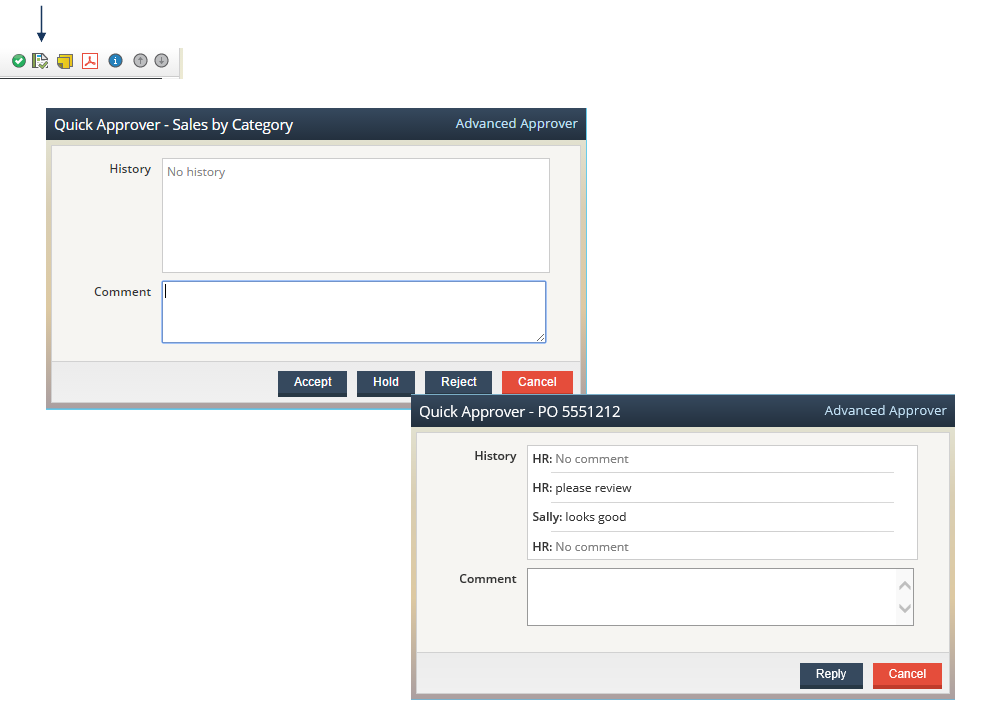
In addition to allowing you to view the previous approval history and add your own comments, the Quick Approver allows you to Accept, Reject or place an action item On Hold. In the case where an action item was forwarded to you by another participant, you will only have the option to: Reply. For any other status options, the Advanced Approver dialog is needed. This can be accessed directly from within the Quick Approver dialog.
Once you have taken an action, the dialog will immediately be closed and the action item will be removed from your personal list of Action Items. Placing the action item on hold will keep in in your action item list.
Advanced Approver Dialog
The Advanced Approver dialog allows you to provide comments, select advanced approval statuses and review previous approval history before acting on the document. The Advanced Approver Dialog can be accessed from any Publication List View or your Action Items View with a right-click > Advanced Approver or directly from within the Quick Approver Dialog
Depending on where you fall within the approval process and default options setup on the Approver Template associated with your approval process, up to three pages will be displayed in the Advanced Approver Dialog: History, Approval (always displayed first by default) and Publication Action.
The Approval Page
When first opened, the Approval page will be displayed. This page provides general information about the action item at the top of the dialog (e.g. Title, Author, Date, etc.), provides an advanced set of approval status options and a place to provide any comments you have regarding the action item.
If desired, you can leave Comments for other participants in the approval process to help clarify actions taken. If a previous participant has entered any comments during their review of the document, they will be displayed (by default) in any subsequent email notifications regarding the action item as well as in the Approval History. The CC text box allows you to enter e-mail addresses (separated by commas or semicolons) for users that you’d like to notify regarding the file status.
The table below details the various Approval Actions that can be taken. Note that depending on where within a given approval process each participant falls, available Approval Actions will vary.
|
Accept |
Searches Report Title field. Supports explicit match or wildcard (*) searching. |
|
Delegate |
Leaves the action item in the original Participant’s action item list and queues it to the selected Delegate. If the Delegate takes an action on the item, it is removed from the original Participant’s action item list. Similarly, if the original Participant takes an action, it is removed from the Delegate’s list. Note: A Delegate will not see the option to Delegate the action item again to another Participant. |
|
Forward |
Removes the action item from the original Participant’s action item list and places it in the Forwardee’s action item list. Note: The only action a Forwardee will see is the Reply action. |
|
Hold |
Maintains the action item in the list for the original Participant and updates the approval status. |
|
Reject |
Immediately terminates the approval process, removing it from all Participant action item lists. |
|
Reply |
Sends the action item back to the sending Participant and removes it from the Forwardee’s action item list. |

After selecting an Approval Action and adding any additional comments you may want, click the Finish button to move the action item forward in the process.
The History Page
At any time within the Advanced Approver dialog, the complete History of what has been done with a given action item can be seen from the History page. The History provides details as to each Approval Action that has occurred (manually or via the System as in an auto-delegate), the date and timestamp on which the Approval Action occurred, any comments made or additional notifications specified as well as any Publication Action that was performed (only applicable to the last step of a given approval process). Approval History can also be seen from a right-click option, discussed in the section titled Right-click Approver Options.
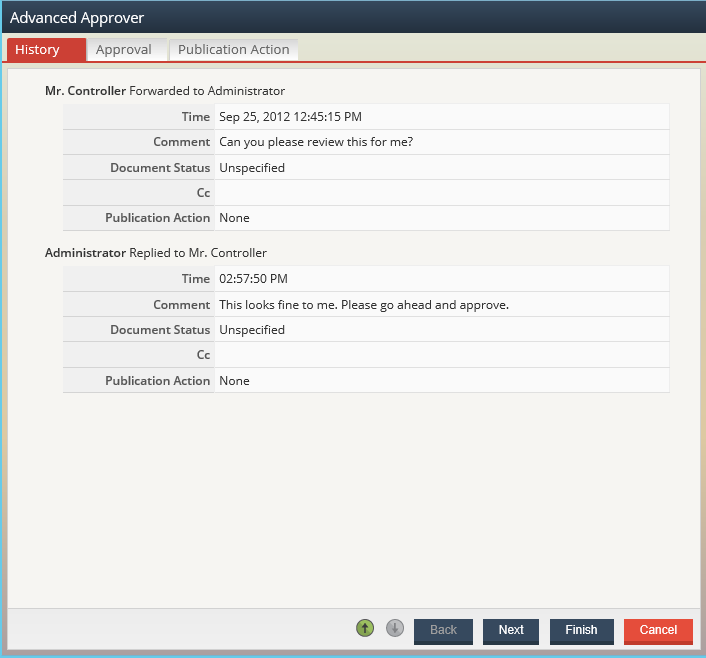
The Publication Action Page
If you are the final (or only) participant in the approval process and you have been given the ability to override any default actions that will be taken once the approval process is completed, you will see a Publication Action page within the Advanced Approver dialog. The rules your administrator may have defined for the Approver Template that governs each approval process may specify that your action item is to be copied or moved to an alternate location once the approval process is completed. For security purposes, any of these predefined actions are hidden from you and instead are simply referred to as “Default.”
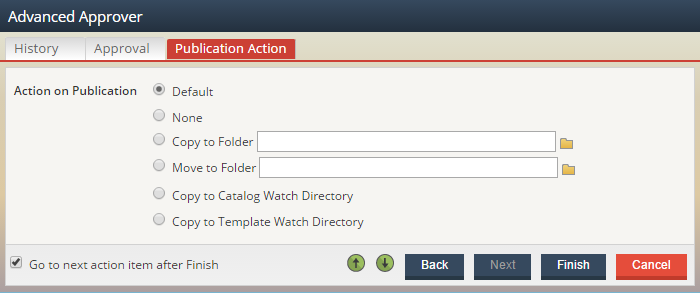
When using the Default setting, any actions to be taken when the approval process is completed are done as the “System” meaning your individual Content Access and Authorizations are not used. However, if you choose to override the Default setting, your specific Content Access and Authorizations will be utilized. The table below details the various Publication Action options.
|
Default |
Uses the default Publication Action settings as defined by the associated Approver Template. |
|
None |
Makes no changes to the document other than updating its approval status. |
|
Copy to Folder |
Leaves the document in the original folder and makes a secondary copy of it in the specified folder. Note that Approval History is maintained on the original document but not on the copied document. |
|
Move to Folder |
Removes the document from its original folder and places it in the specified folder. All Approval History is maintained on the document. |
|
Copy to Catalog Watch Directory |
Places a copy of the document in the Catalog watch directory to be picked up and processed. |
|
Copy to Template Watch Directory |
Places a copy of the document in the corresponding approval template watch directory to be picked up and processed. |
When copying or moving action items, it is possible to have a collision, meaning the action item being moved or copied already exists in the targeted folder. A file collision is detected when two documents with the exact same file name and date/timestamp are found. For more details on handing file collisions see the Online Help topic titled Resolving File Collisions.
Cycling Through Action Items
If more than one action item is in your personal queue, Action Item List navigation arrows as well as the Go to next action item after Finish option is available at the bottom of the Advanced Approver dialog. The navigation arrows allow you to move to the next or previous action item without taking any action on the currently viewed item. Enabling the Go to next action item option will immediately bring up the next action item in your list for review once the Finish button has been clicked.

Right-click Approver Options
Once an approval process has terminated (or should you wish to approve an action item directly from a Folder List View rather than the My Action Items view), options to view what happened during the approval process or take an action are a right-click away.
Approval History
Available to any Member associated with the Approver Participant authorization, from all list views a right-click > Approval History option will be available for selection.
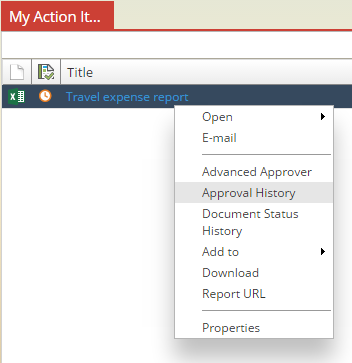
Like the History page of the Advanced Approver dialog, the Approval History details each participant and the actions taken during the approval process associated with the document.
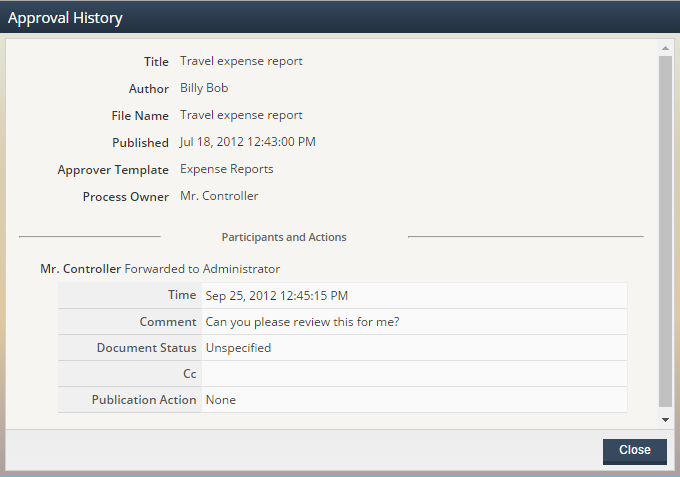
Advanced Approver
From any Folder List View or the My Action Items list view a right-click > Advanced Approver option will be available for selection. When selected, this will bring up the standard Advanced Approver dialog.
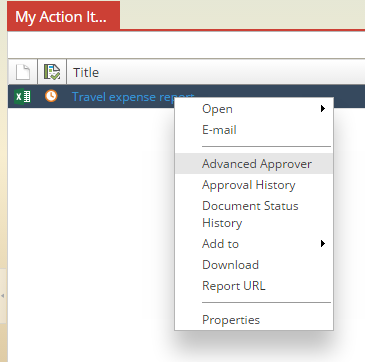
Taking Action on Behalf of a Participant
Users that have been designated as a delegate for a Participant can have items queued to them that are originally intended for someone else. When taking an action, essentially, they are acting on behalf of the originally intended participant. Similarly, users associated with the Super Approver authorization can act on any action item. For auditing purposes, it is important to understand what truly transpires during a given approval. As such, when user takes an action on an action item not specifically queued to them, within the Advanced Approver dialog, users will see a notation that indicates who they are acting on behalf of as shown in the screen shot below.
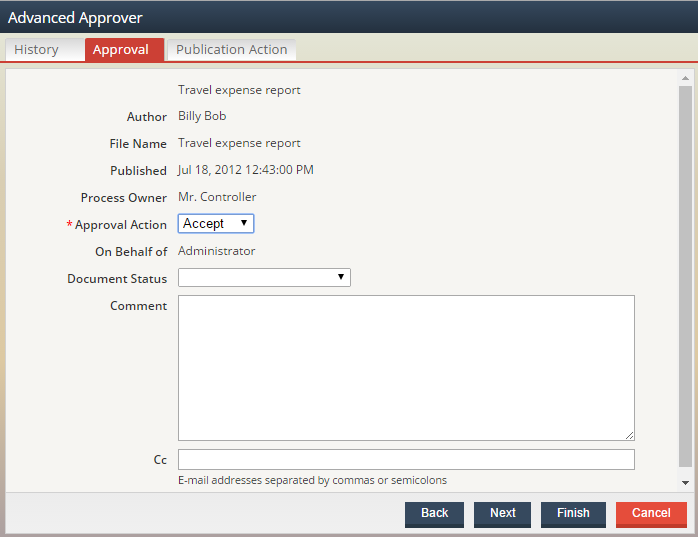
When viewing the history for an action item, any approval actions taken on behalf of another user are also noted appropriately as shown below.
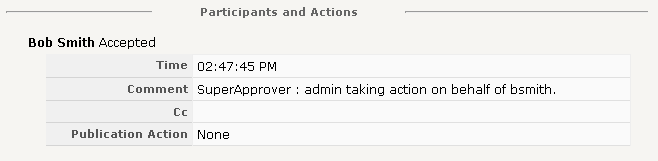
Viewing Action Items as a Super Approver
If you are associated with a Role that includes the Super Approver authorization you will have access to a list of all pending action items in addition to those in your personal queue. With this authorization, you are also automatically given the ability to view any pending action item from the list – independent of your personal Content Access permissions as well as immediately act on them. Once an action item has reached its final termination state, and thus removed from the Action Items list view, regular Content Access rights apply.
To view the complete list of all pending action items, select the My Action Items toolbar icon and check the All option as shown below.
Once selected, the My Action Items list view will be updated to include all outstanding action items as well as the name of the Member that is currently assigned the action item (Pending Participant).
In cases where an action item has been delegated to another Participant or forwarded to another Participant, a visual queue will be displayed next to the Pending Participant’s name. Hover over the Participant’s name to view the details regarding any forward or delegation activities.
As an example, hovering over the name Administrator shows us that he had the action item forwarded to him by Mr. Controller as shown below.
Similarly, hovering over the HR Manager’s name shows us that they delegated an action item to Sally User in this example.

Accessing Report2Web on the iPad
Report2Web offers support for the most common end user activities (e.g. folder navigation, viewing and searching for reports) on the iPad. When users access Report2Web from an iPad, it will detect the Mobile Safari browser and adjust the view and functionality available to you accordingly. As there are several features that are used differently on an iPad (e.g. the equivalent of right-click menus) and some that simply are not supported currently by iPad technology, this help topic has been created to define supported functionality and demonstrate use on an iPad.
Supported Environments
Redwood currently provides iPad support for Report2Web on Apple iOS 8 | 9 and 10. As iOS updates are made available and tested, any additionally supported iOS releases will be announced as appropriate.
Imposed Limitations
As the primary usage of Report2Web with an iPad is to retrieve, and view documents number of standard features have been intentionally disabled. In general, those features most commonly used by the end user community are supported unless otherwise noted in the following sections. All administrative features and menus are intentionally disabled on the iPad.
-
Independent of authorizations, the only menu options available on the iPad are Folders, Categories and Keywords.
-
Independent of authorizations, the My Subscriptions icon and related functionality is not available on the iPad. Users will still receive any subscriptions assigned to them but creation or modification of subscriptions is not supported.
-
Independent of authorizations, the Send Suggestion icon is not available on the iPad.
-
As the iPad doesn’t natively support the ability to multi-select list items within the application, the Bundle feature has been disabled.
-
To bypass default scrolling behavior on the iPad, when selecting a document for viewing, the document will always be opened in a new tab within the Safari browser.
-
When viewing documents, users can view existing Notes, but new Notes cannot be created.
-
While the document selected for viewing may be available in multiple formats, only the default format is available within the iPad.
-
Opening documents via the Report2Web Third Party Application option is not supported on the iPad. However, individual applications that may be installed on your iPad may facilitate the opening of a document in third party application. Consult the document provided by your iPad application vendor for additional information.
-
Due to default pop-up behavior on the iPad, when accessing documents via an email hyperlink, after signing in, the user will be prompted to Continue to the document before the document is rendered within a browser tab.
Report Formats
It is common for content housed in Report2Web to vary in format (e.g. .txt, .PageMart, .xls, .pdf, etc.). While Redwood has control over viewing our native PageMart format, as when accessing Report2Web through a standard browser, default viewing applications are used to render other document types based on their format (file extension). As such, depending on the individual applications installed and settings established on a given iPad, the access time and rendering of a given document will vary. In general, Redwood has found that smaller file sizes render best using default iPad viewers. If your targeted files for access on the iPad are larger in size, you may want to consider using the Report2Web Burster to split files into smaller subsets based on content. Alternatively, you may want to investigate the Apple App Store for an array of utilities that enhance the default viewing capabilities of the iPad.
Signing in to Report2Web
Before accessing any reports, you must first sign in to the application. In addition to a User ID and Password, you will also need to specify which Catalog of information you want to initially access. If enabled by your administrator, when selected the Remember User ID option will remember your User ID after you terminate a session so that the next time you access the sign in page, it is pre-populated for you.
While the sign-in process is the same as within a standard browser, any default (e.g. About us, Contact, Support, etc.) or custom links that are associated with the sign-in page are not accessible via the iPad.
Providing Sign in Credentials
Select your desired Catalog by tapping on the Catalog selection list. To display the iPad keyboard and enter your login credentials, tap in the User ID text field. After entering your User ID, tap in the Password text field and enter the appropriate value. To submit your credentials, tap the Go button on the iPad keyboard or tap on the Sign in button on the Report2Web sign in page.
Changing the Default Language
The top of the sign-in page also includes an option to modify the default language that will be used for the application after you sign in. If your Administrator has enabled multiple languages, tapping on the current language name, will display a selection list of available languages. The currently selected language will be noted with a checkmark.
After selecting your desired language tap on the Change Language (green arrow) button. To ignore the language selection option without making changes, tap on the Hide change language controls button (X button).
Navigating Report2Web on the iPad
As the iPad operating system and native behavior varies from that available on a standard laptop or workstation, several typical tasks are performed in an alternate way. This chapter details those viewing features that are accessed or executed differently on an iPad than within a standard browser. For complete information on Report2Web features, refer to the appropriate topic within the Online Help.
Switching Between Catalogs
At the top of the application window, the Title bar displays the name of the currently signed in user and the current Catalog name. To the right of the Catalog name, you can log out of your session by tapping the red Sign out button. If you have access to more than one Catalog, a list enumerating all available Catalogs will be displayed (in alphabetical order) rather than a static Catalog name. To switch to a different Catalog, tap the Catalog name and again tap on the desired Catalog name.
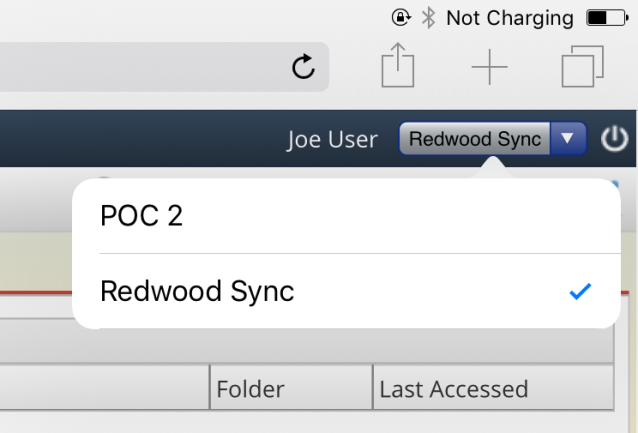
The Standard Toolbar
The Toolbar provides one-click access to the most commonly used features of the application. Below is a listing of the standard Toolbar options available for the iPad and the functionality they provide. As you select each option, the display in the Content Area will immediately change to reflect your selection. Note that because of imposed limitations, the toolbar icons available for selection on the iPad may not necessarily reflect your individual authorizations.
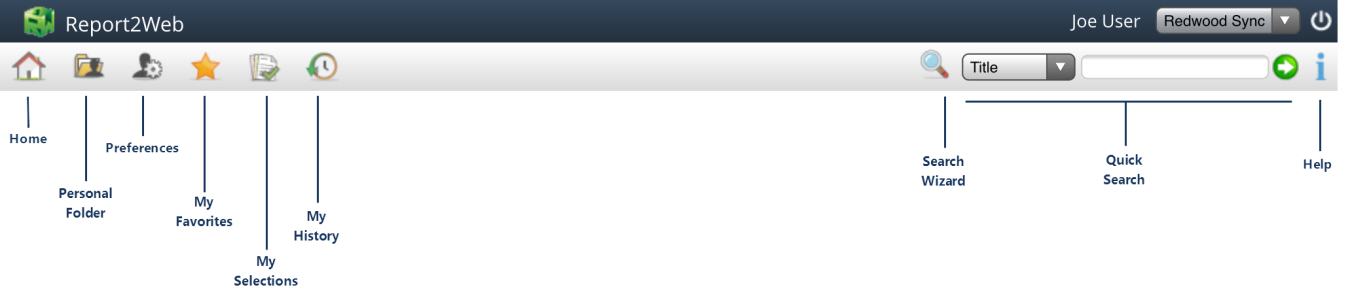
|
Home |
Refreshes the Content Area with standard Home tab content. |
|
Personal Folder |
Reports published in folders that are inherently accessible only to the logged in user. Other than Administrators, a Personal Folder cannot be accessed by any other users. |
|
Preferences |
Specifies individual user preferences such as default theme, language and toolbar icon display. |
|
My Favorites |
Spanning across all folders, provides instant access to the most recent version of frequently used reports, without requiring any additional folder navigation. |
|
My Action Items |
Available only for authorized users, displays a list of all Action Items waiting for review by the logged in user. |
|
My History |
Provides links to reports recently viewed by the logged in user. |
|
Search Wizard |
Provides access to the Keyword and Advanced Search Wizards. Access to this icon is based on individual user authorizations. |
|
Quick Search |
Allows for simple searches based on standard report metadata (e.g. Title, Author, etc.). Access to this icon is based on individual user authorizations. |
|
Help |
Displays the online help facility. Individual user authorizations will control which sections of the Online Help will be available for viewing. |
The PageMart Viewer
Disabled Functionality
Independent of individual user authorizations, the following features are disabled when viewing PageMart documents on an iPad:
-
Export Button
-
Freeze Rows/Columns button
-
Font size increase/decrease
Line Item Notes
PageMart Line Item notes can be viewed individually by hovering over the associated Notes icon within the margin of the report (as shown below). To view a listing of all Line Item Notes, tap once on the Notes icon found on the PageMart toolbar.
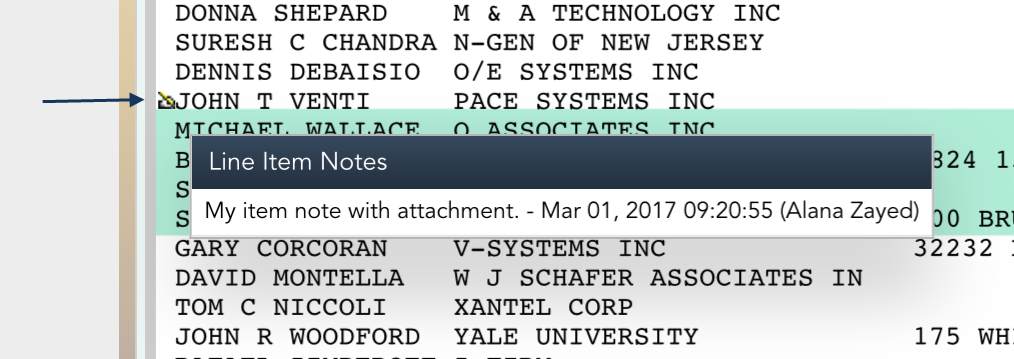
The Notes dialog will open in a new tab within the browser. Tap the Close button or click the X on the -Report2WebNotes tab to close the dialog.
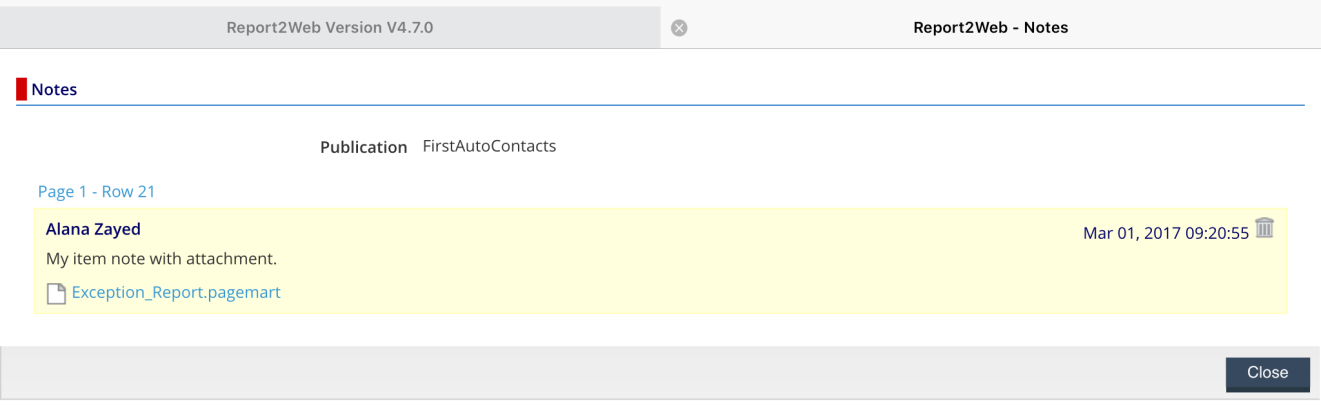
Right-click Menu Access
As there is no equivalent of the right-click mouse action in an iPad environment, those right-click features that are supported on the iPad are accessible by tapping once on the format icon.
Depending on where you are within the application, the menu options available when tapping on the format icon will vary.
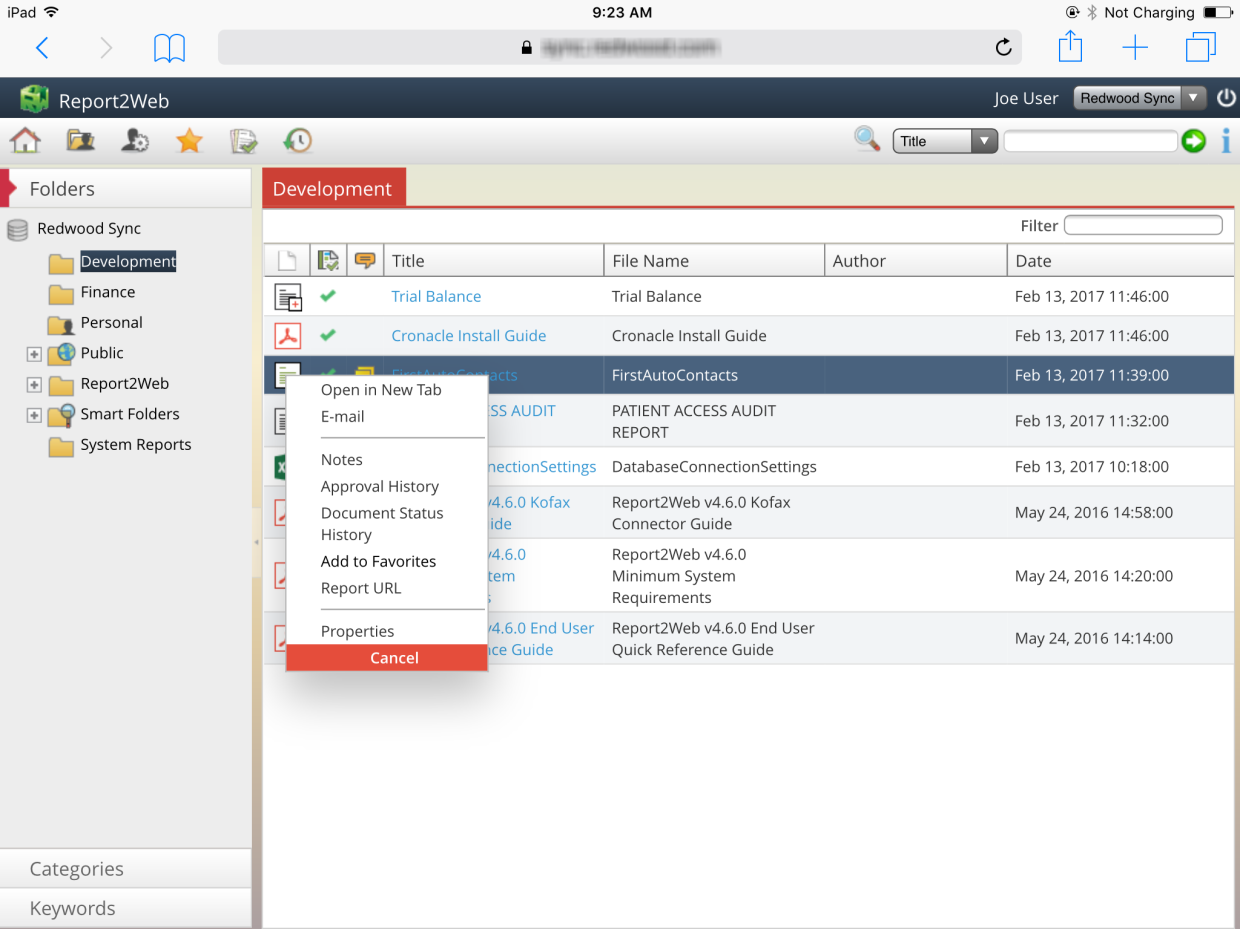
E-mailing Reports
Tapping on the Format icon and selecting the E-mail option will open the Email Report wizard in a new tab. Tap in the To field to directly enter an email address or tap on the Users icon to select the email address from a list. Similarly, tap on the CC field to directly enter any additional email addresses.
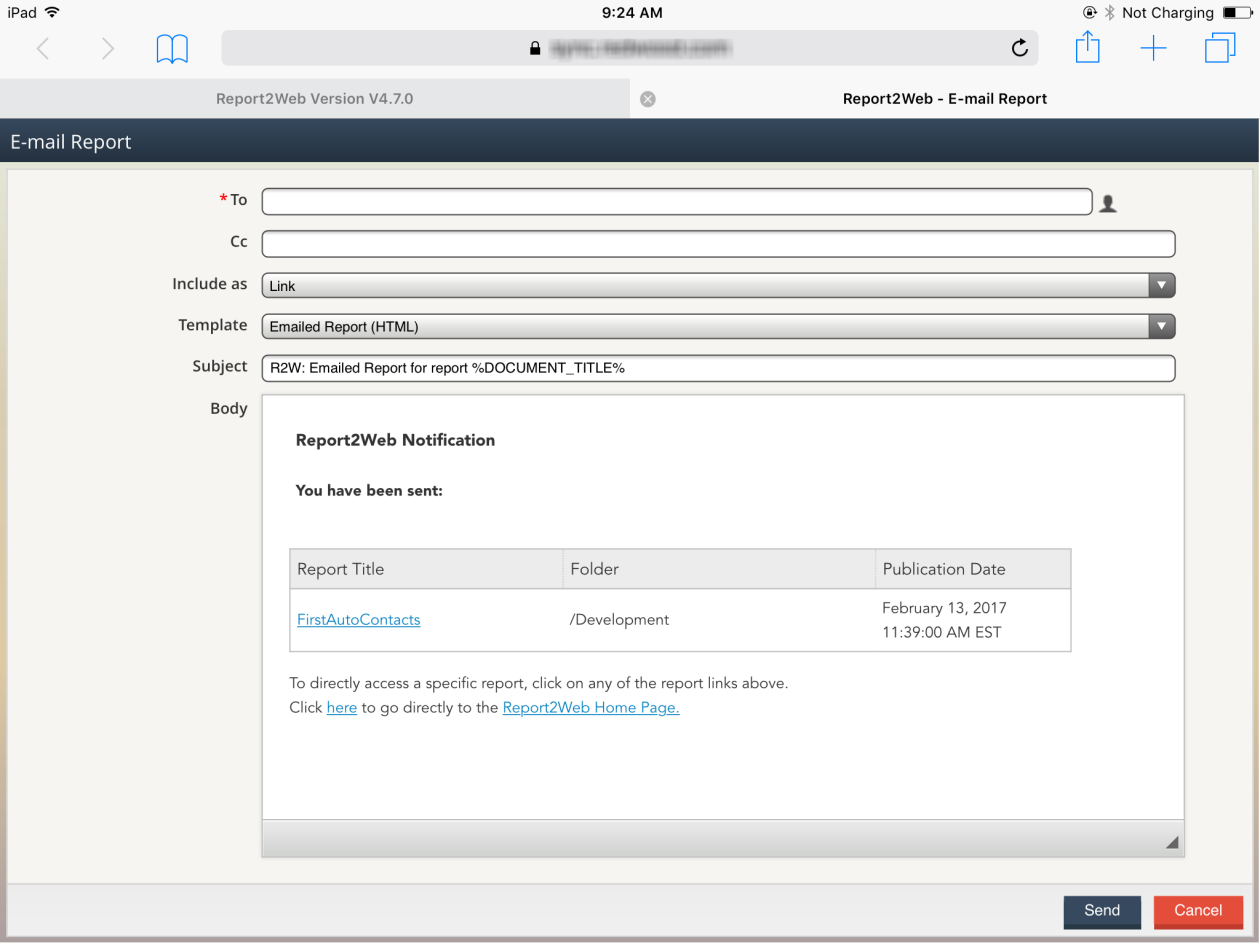
If you wish to modify the default Include as or Template selection values, tap on the appropriate selection list. The currently selected option will be noted with a checkmark. Tap on the desired option to change the default selection.
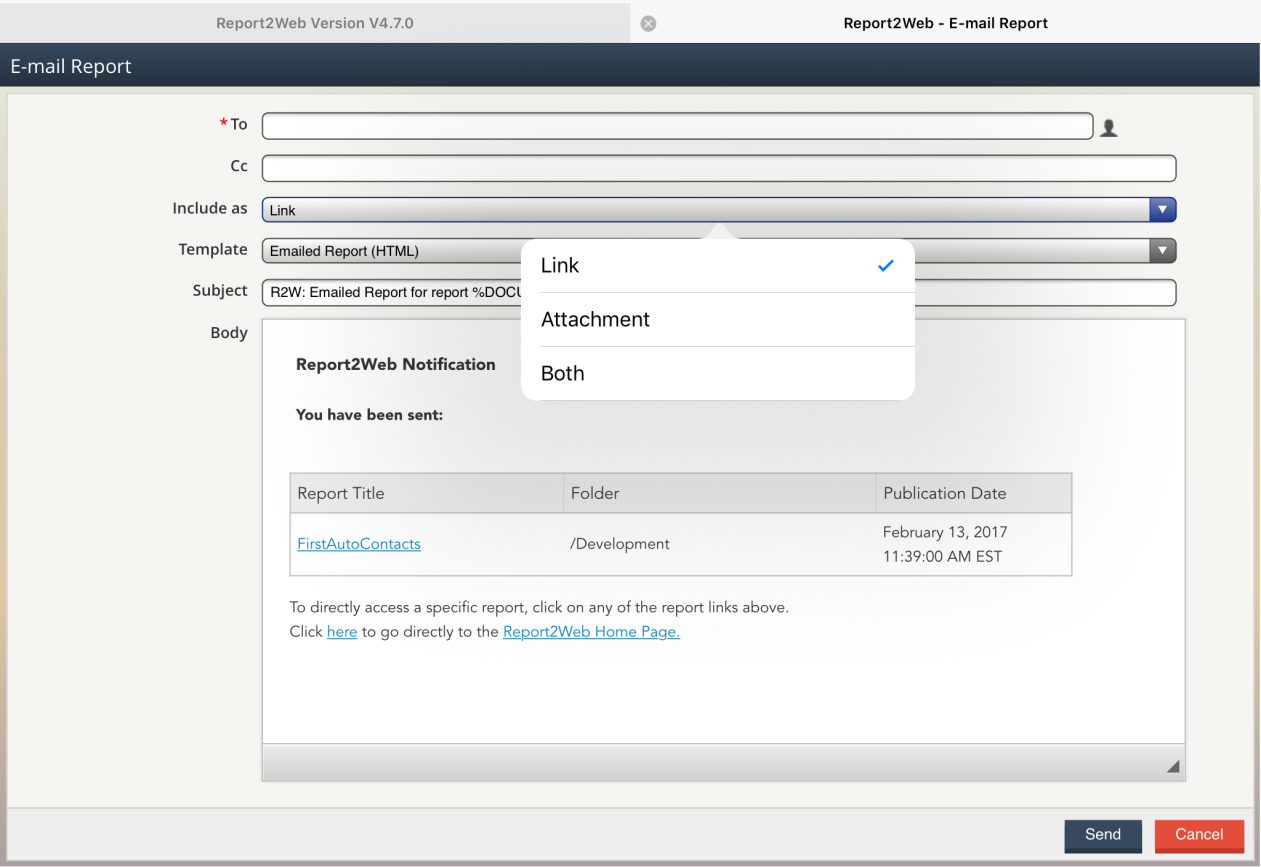
Click the Send button to complete the email process or click the Cancel button to terminate the email.
Viewing Report Versions
If multiple versions of a given report are available, from any list view, tap once on the Format icon and select the Versions option. The Version list will open in a new tab within the browser. Tap the Close button or click the X on the Versions tab to close the dialog.
Viewing Document Notes
If a document has associated Notes, from any list view, tap once on the Format icon and the Notes option will be available. The Notes dialog will open in a new tab within the browser. Tap the Close button or click the X on the Report2Web-Notes tab to close the dialog.
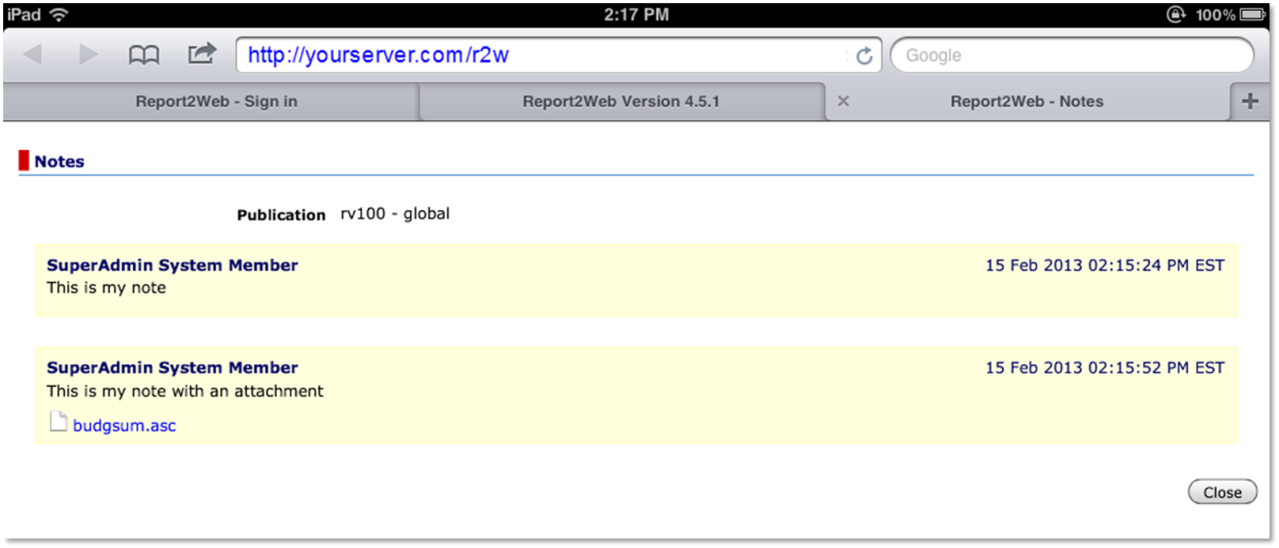
Adding Favorites
Tapping on the Format icon and selecting the Add To Favorites option add the selected document to the My Favorites list associated with the logged in user.
Viewing Report Properties
Tapping on the Format icon and selecting the Properties option will open the Properties Wizard in a new tab.
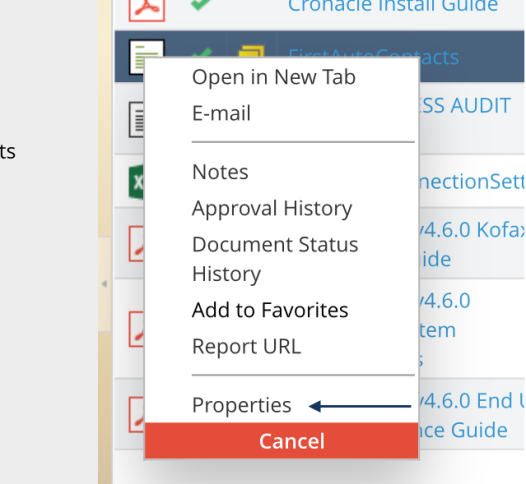
The Properties Wizard displays read-only information associated with the selected report in four distinct pages: General, Categorization, Metadata and Retention. By default, the General page will be displayed. Tap on any of the page names (or Next button) to view the associated information. Tap on the Finish button to exit.
Action Item Access
The Approver is an optional module that facilitates document-centric approval processes within Report2Web. Once initiated, an approval process queues a document, known as an “Action Item”, to a predetermined list of users or groups for review. The topics below specifically detail how to access and work with Action Items on the iPad as opposed to the full Report2Web user interface and assume that you are already familiar with basic approval functionality. Complete details on the Approver can be found in the Online Help topic titled Working with Action items.
When first logging in, the Home page will display a brief list of any outstanding action items that are currently in your queue under the My Action Items heading. As the name indicates, the My Action Items heading and list view only include those items that are specifically queued to you. From the Home page, click on the title of any action item to view it.
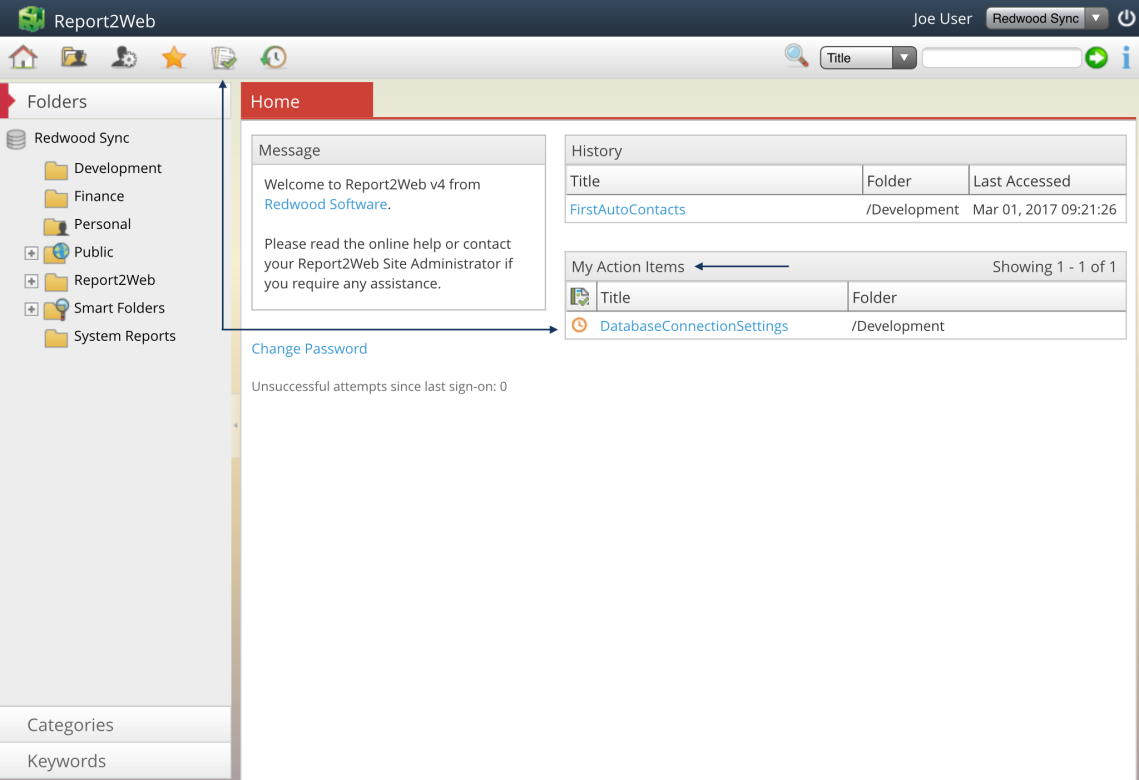
You can also view a list of all your action items by clicking the My Action Items icon from the toolbar. The My Action Items list details not only the titles of each document pending your approval, but its status as well. As with any other list view, clicking on the title of the action item will open it up for viewing.
Accessing the Quick Approver Dialog
When viewing an Action Item, the Quick Approver dialog can be accessed directly from the Quick Approve icon on the toolbar as shown below.
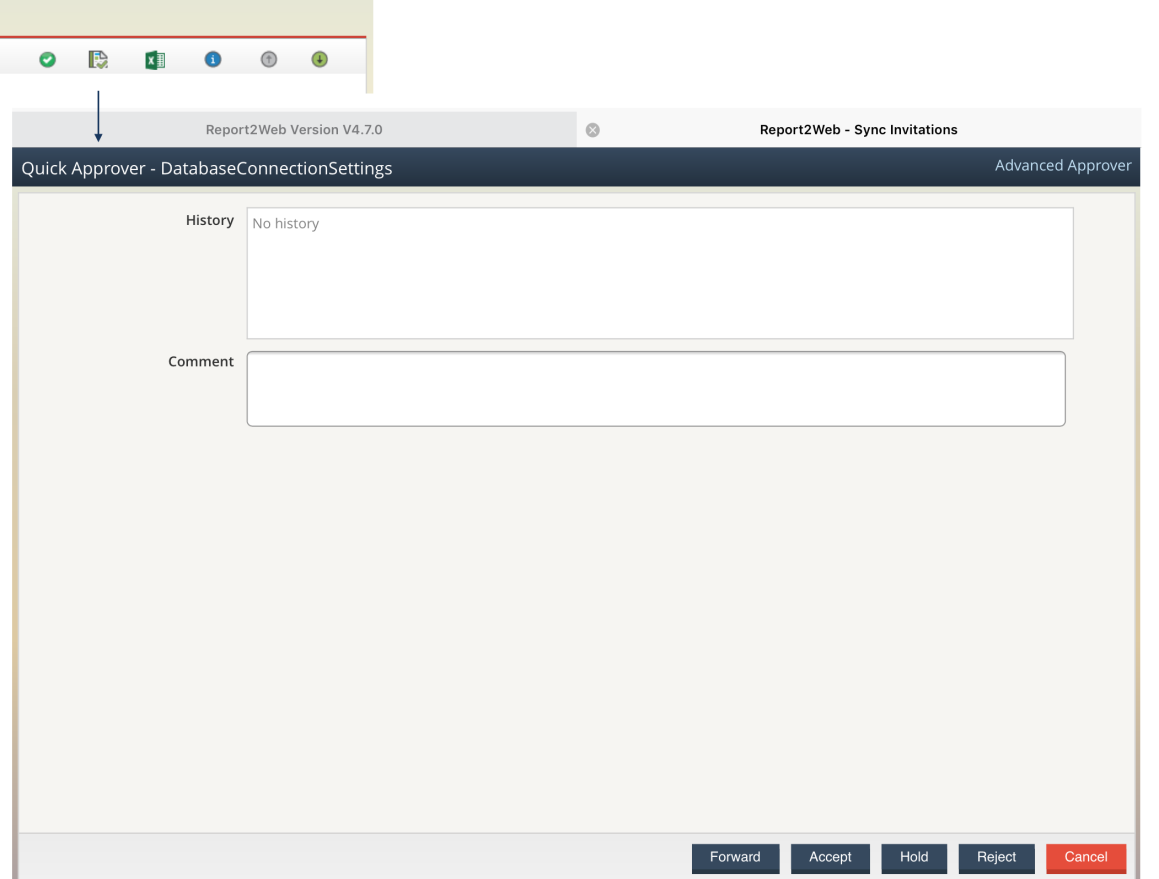
Accessing the Advanced Approver Dialog
The Advanced Approver Dialog can be accessed on an iPad in two ways. If you have already accessed the Quick Approve dialog from the toolbar, you can click on the Advanced Approver link in the top-right corner as shown below:
Alternatively, from the My Action Items list, tap on the format icon and then tap the Advanced Approver menu item.
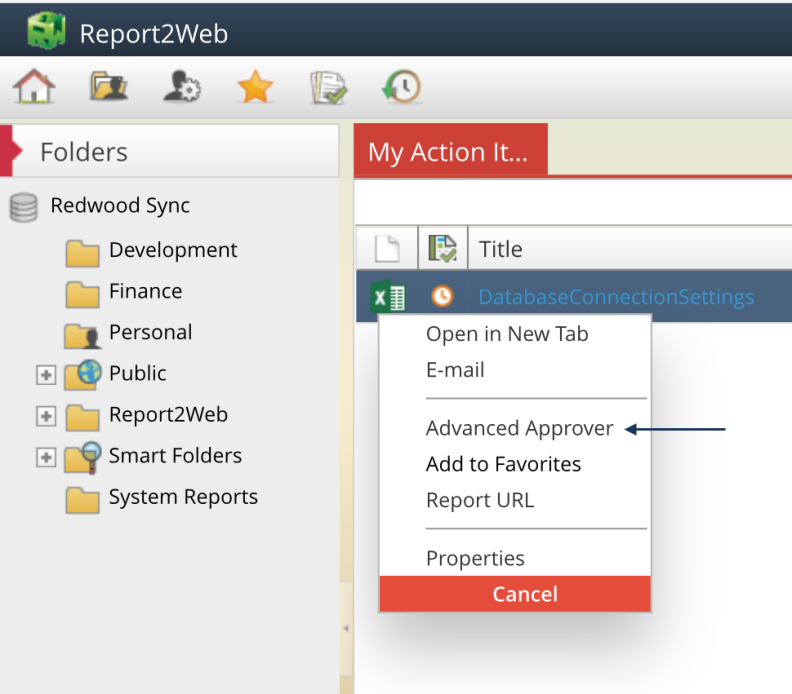
Once open, the Advanced Approver dialog appears as shown below. The Approval tab will allow for performing routine Action Item tasks, while tapping on the History tab will display a history of all previous actions that have been taken.
